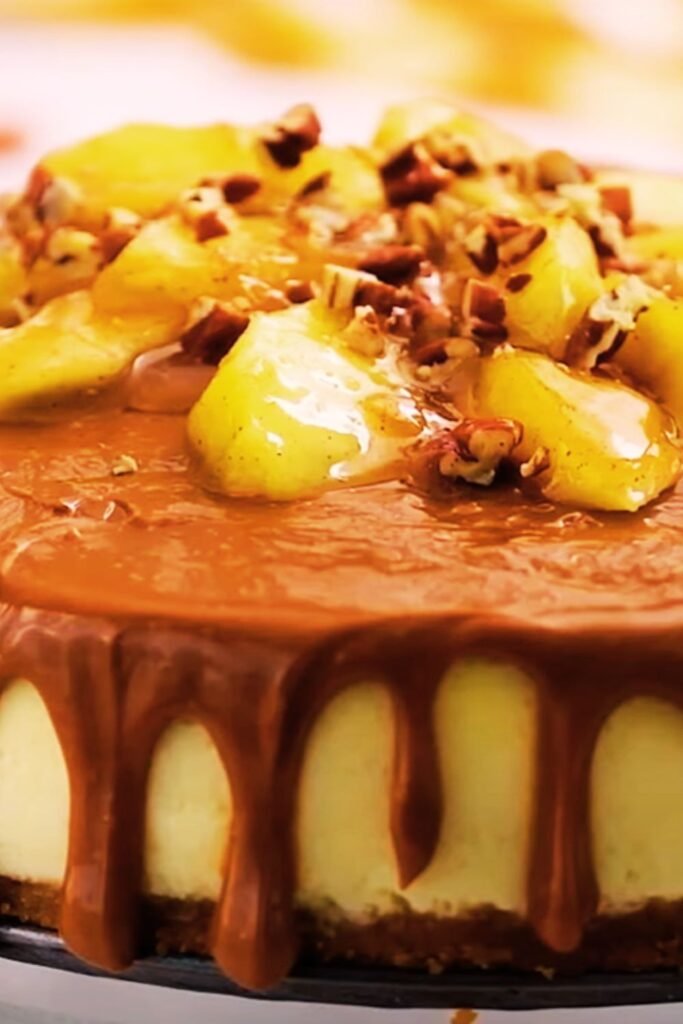
There’s something magical about the moment when a fork glides through multiple layers of dessert perfection, capturing the essence of fall in a single bite. As someone who’s spent countless hours perfecting the art of baking, I can confidently say that my Salted Caramel Apple Pie Cheesecake is the crown jewel of my recipe collection. This isn’t just any dessert—it’s a celebration of autumn’s bounty, transformed into a show-stopping masterpiece that combines three beloved classics into one unforgettable experience.
The journey to creating this recipe wasn’t straightforward. I’ve tested dozens of variations, tweaking ingredients and methods until I achieved the perfect balance: a buttery graham cracker crust enhanced with cinnamon, a velvety smooth vanilla cheesecake center, a layer of spiced apple pie filling, and a generous drizzle of homemade salted caramel sauce. Each component is delicious on its own, but together? They create something truly extraordinary.
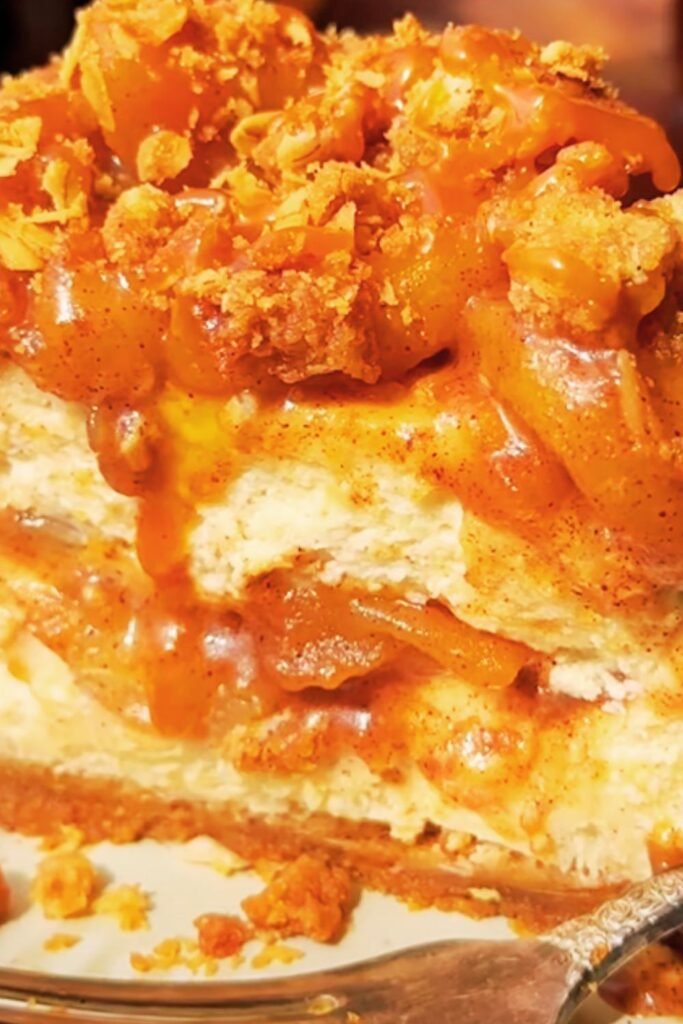
Whether you’re looking to impress guests at your next gathering or simply treating yourself to something special, this Salted Caramel Apple Pie Cheesecake delivers on all fronts. The combination of textures and flavors—creamy, crunchy, sweet, tart, and salty—creates a symphony for your taste buds that’s impossible to resist.
So tie on your apron, preheat your oven, and join me as I guide you through creating this spectacular dessert that captures the very essence of fall indulgence.
The Magic of Combining Three Desserts in One
There’s a certain alchemy that happens when you combine cheesecake, apple pie, and salted caramel. Each element brings something unique to the table:
Apple Pie : The quintessential comfort dessert, bringing warmth through cinnamon-spiced apples and nostalgic flavors that remind us of home.
Cheesecake : A velvety, rich canvas that provides a luxurious mouthfeel and tangy counterpoint to the sweet elements.
Salted Caramel : The sophisticated finish that elevates everything it touches, adding complexity through the perfect balance of sweet and salty notes.
I’ve found that these three desserts don’t just complement each other—they enhance one another. The slight tartness of the apples cuts through the richness of the cheesecake, while the salted caramel ties everything together with its buttery depth.
Ingredients You’ll Need
For the Graham Cracker Crust:
- 2 cups graham cracker crumbs (about 16 full sheets)
- 1/4 cup granulated sugar
- 1/2 teaspoon ground cinnamon
- 1/2 cup (1 stick) unsalted butter, melted
- Pinch of salt
For the Cheesecake Filling:
- 4 packages (32 oz total) cream cheese, softened to room temperature
- 1 cup granulated sugar
- 1/4 cup sour cream, room temperature
- 2 teaspoons pure vanilla extract
- 4 large eggs, room temperature
- 1/4 teaspoon salt
For the Apple Pie Filling:
- 4 medium-sized apples (preferably a mix of Granny Smith and Honeycrisp)
- 2 tablespoons unsalted butter
- 1/3 cup brown sugar, packed
- 1 tablespoon lemon juice
- 1 teaspoon ground cinnamon
- 1/4 teaspoon ground nutmeg
- 1/8 teaspoon ground allspice
- 2 tablespoons cornstarch
- 2 tablespoons water
For the Salted Caramel Sauce:
- 1 cup granulated sugar
- 6 tablespoons unsalted butter, cut into pieces, room temperature
- 1/2 cup heavy cream, room temperature
- 1 teaspoon pure vanilla extract
- 1 teaspoon flaky sea salt (like Maldon)
Essential Equipment
Before we dive into the making process, let’s make sure you have all the necessary tools at hand:
- 9-inch springform pan
- Parchment paper
- Large mixing bowls
- Electric mixer (stand or hand)
- Spatulas (rubber and offset)
- Measuring cups and spoons
- Heavy-bottomed saucepan (for caramel)
- Large skillet (for apple filling)
- Aluminum foil (for water bath)
- Roasting pan (for water bath)
- Wire cooling rack
- Food processor (optional, for graham crackers)
Step-by-Step Instructions
Preparing the Graham Cracker Crust
- Preheat your oven to 350°F (175°C).
- Wrap the outside of a 9-inch springform pan with a double layer of heavy-duty aluminum foil, ensuring it comes at least halfway up the sides. This prevents water from seeping in during the water bath baking.
- In a large bowl, combine graham cracker crumbs, sugar, cinnamon, and salt.
- Pour in the melted butter and mix until the mixture resembles wet sand.
- Press the mixture firmly into the bottom and about 1-inch up the sides of the prepared springform pan. I like to use the bottom of a measuring cup for even compaction.
- Bake the crust for 10 minutes until lightly golden. Remove from the oven and allow to cool completely.
- Reduce the oven temperature to 325°F (160°C).
Making the Cheesecake Filling
- In the bowl of a stand mixer fitted with the paddle attachment (or using a hand mixer), beat the cream cheese on medium-low speed until completely smooth, about 2 minutes.
- Add the sugar and beat until smooth and combined, about 1 minute. Scrape down the sides of the bowl as needed.
- Add the sour cream and vanilla extract, beating until fully incorporated.
- On low speed, add the eggs one at a time, mixing just until each is incorporated before adding the next. (Overmixing after adding eggs can cause the cheesecake to crack.)
- Add the salt and mix briefly to combine.
- Pour the filling over the cooled crust and smooth the top with an offset spatula.
- Set aside while preparing the apple layer.
Preparing the Apple Pie Filling
- Peel, core, and dice the apples into approximately 1/2-inch cubes.
- In a large skillet over medium heat, melt the butter.
- Add the diced apples, brown sugar, lemon juice, cinnamon, nutmeg, and allspice. Stir to combine.
- Cook the apple mixture for about 5-7 minutes, until the apples have softened slightly but still maintain some firmness.
- In a small bowl, whisk together the cornstarch and water to create a slurry.
- Pour the slurry into the apple mixture and cook for an additional 1-2 minutes, until the sauce has thickened.
- Remove from heat and let cool for about 15 minutes.
Assembling and Baking the Cheesecake
- Gently spoon the cooled apple mixture over the cheesecake filling, leaving a 1-inch border around the edge. This allows the cheesecake to rise properly during baking.
- Place the springform pan in a large roasting pan.
- Pour hot water into the roasting pan until it reaches about halfway up the sides of the springform pan, creating a water bath.
- Carefully transfer to the oven and bake for 65-75 minutes, until the edges are set but the center still has a slight jiggle.
- Turn off the oven, crack the door open, and let the cheesecake cool in the oven for 1 hour. This gradual cooling helps prevent cracking.
- Remove from the oven and water bath, then run a thin knife around the edges to loosen the cheesecake from the pan.
- Let cool completely at room temperature, then refrigerate for at least 6 hours, preferably overnight.
Creating the Salted Caramel Sauce
- In a medium heavy-bottomed saucepan, heat the sugar over medium heat, watching carefully.
- As the sugar begins to melt, gently swirl the pan occasionally to help it melt evenly. Do not stir with a utensil as this can cause crystallization.
- Continue heating until the sugar has completely melted and turned a deep amber color (around 350°F if you have a candy thermometer).
- Carefully add the butter pieces (the mixture will bubble vigorously). Whisk until the butter is completely incorporated.
- Remove the pan from heat and slowly pour in the heavy cream while whisking constantly (it will bubble up again).
- Add the vanilla extract and sea salt, whisking to combine.
- Let the caramel sauce cool for about 15 minutes before using. It will thicken as it cools.
Final Assembly
- Once the cheesecake has chilled completely, carefully remove it from the springform pan and transfer to a serving plate.
- Drizzle about half of the salted caramel sauce over the top of the cheesecake, allowing it to drip down the sides.
- Reserve the remaining caramel sauce for serving.
- For an extra touch, you can garnish with thin apple slices, a sprinkle of cinnamon, or even some crushed graham crackers.
Pro Tips for Cheesecake Success
- Room Temperature Ingredients: This is non-negotiable for the cheesecake filling. Cold cream cheese will lead to lumps that are nearly impossible to smooth out.
- The Water Bath Method: Though it adds an extra step, the water bath ensures gentle, even cooking that prevents cracks and creates the silkiest texture.
- Patience is Key: Resist the urge to rush the cooling process. The gradual temperature changes are crucial for preventing cracks and ensuring the perfect texture.
- Make Ahead: This dessert actually improves with time. Make it 1-2 days in advance for the best flavor development.
- Caramel Safety: When making the caramel sauce, have all ingredients measured and ready before starting. Once the sugar begins to caramelize, the process moves quickly.
Variations to Try
While this recipe is divine as written, here are some delicious variations I’ve experimented with over the years:
- Nutty Crust: Add 1/2 cup finely chopped pecans or walnuts to the graham cracker crust for added texture and flavor.
- Boozy Apples: Add 2 tablespoons of bourbon or apple brandy to the apple filling for a sophisticated twist.
- Streusel Topping: Create a simple streusel with flour, brown sugar, butter, and cinnamon to sprinkle over the apple layer before baking.
- Chocolate Enhancement: Drizzle some melted dark chocolate over the finished cheesecake alongside the caramel for a decadent touch.
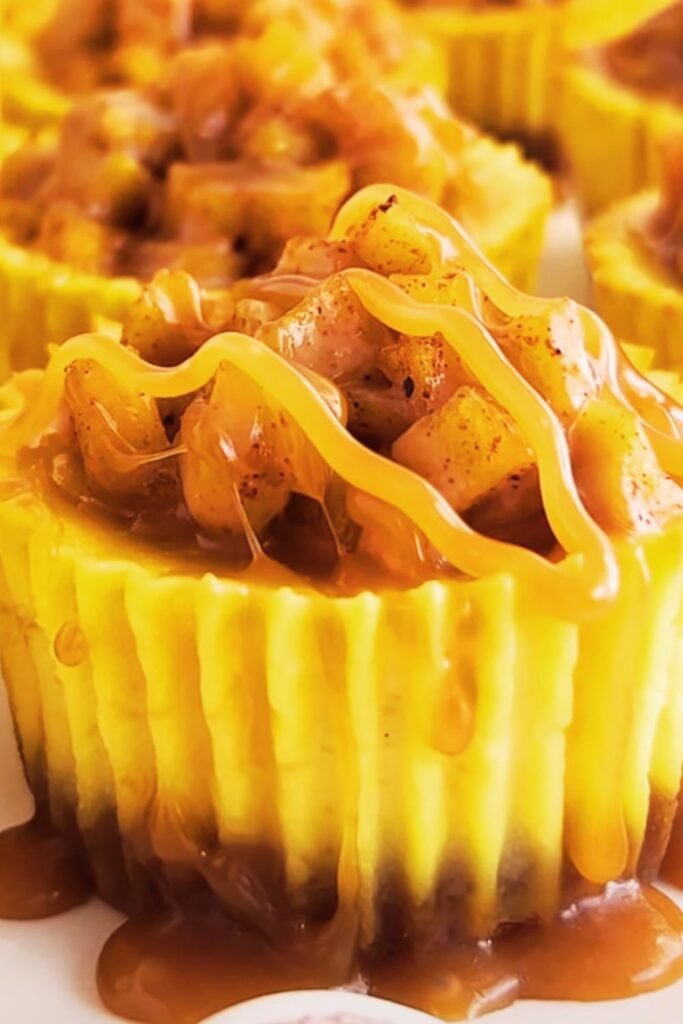
- Mini Versions: Use a muffin tin with liners to create individual portions—perfect for gatherings where sharing might be a concern.
Nutritional Information
For those who like to keep track of what they’re enjoying, here’s the approximate nutritional breakdown per serving (assuming 12 servings per cheesecake):
| Nutrient | Amount per Serving |
|---|---|
| Calories | 685 |
| Total Fat | 43g |
| Saturated Fat | 25g |
| Cholesterol | 210mg |
| Sodium | 410mg |
| Total Carbohydrates | 68g |
| Dietary Fiber | 2g |
| Sugars | 53g |
| Protein | 8g |
Storage and Make-Ahead Tips
This cheesecake is the perfect make-ahead dessert, as it actually improves with a day or two of chilling. Here’s how to store it:
- Refrigeration: Covered, the cheesecake will keep in the refrigerator for up to 5 days. I recommend storing any leftover caramel sauce separately.
- Freezing: This cheesecake freezes beautifully! Wrap individual slices or the whole cake (without the caramel drizzle) tightly in plastic wrap, then aluminum foil. It will keep for up to 2 months.
- Thawing: Thaw frozen cheesecake overnight in the refrigerator before serving. Add fresh caramel drizzle after thawing.
Serving Suggestions
To make your Salted Caramel Apple Pie Cheesecake truly memorable, consider these serving ideas:
- Warm the reserved caramel sauce slightly and serve on the side so guests can add extra as desired.
- A dollop of freshly whipped cream provides a lovely contrast to the rich cheesecake.
- For special occasions, serve with a scoop of high-quality vanilla ice cream.
- A sprinkle of toasted chopped nuts adds wonderful texture and visual appeal.
- Hot coffee or spiced apple cider make perfect beverage pairings.
Troubleshooting Common Issues
Even experienced bakers encounter challenges occasionally. Here’s how to solve some common cheesecake problems:
Cracked Cheesecake
If your cheesecake develops cracks despite your best efforts:
- Cover with salted caramel sauce – no one will ever know!
- Remember, cracks don’t affect the taste, only the appearance.
- For future bakes, ensure you’re not overmixing after adding eggs and are using the water bath method.
Runny Caramel
If your caramel sauce is too thin:
- Allow it to cool completely – it will thicken as it cools.
- If still too thin, return to low heat and simmer for a few more minutes.
- Store in the refrigerator to thicken further.
Soggy Crust
To prevent a soggy bottom:
- Ensure the crust is pre-baked until lightly golden.
- Double-check that your foil wrapping is watertight before creating the water bath.
- Consider using a silicone wrap designed specifically for springform pans.
Why This Recipe Works
After years of testing and refining, I’ve discovered that the success of this recipe comes down to several key factors:
- The Proper Balance: The richness of the cheesecake is perfectly balanced by the slight tartness of the apples and the sophisticated salty-sweet notes of the caramel.
- Textural Contrast: From the crisp graham cracker crust to the creamy cheesecake, tender apples, and smooth caramel – each bite offers a delightful variety of textures.
- Strategic Layering: By adding the apple mixture on top of the cheesecake batter rather than mixing it in, we maintain the distinct layers that make this dessert so special.
- The Water Bath Method: This ensures gentle, even cooking that results in the silkiest, creamiest cheesecake texture possible.
Frequently Asked Questions
Q: Can I make this cheesecake without a springform pan?
While a springform pan makes removal much easier, you can use a regular 9-inch cake pan lined with parchment paper with long overhang edges to help lift the cheesecake out after cooling. Just be aware that the sides may not look as clean.
Q: What are the best apples to use for this recipe?
I prefer a mix of Granny Smith for tartness and structure, plus Honeycrisp for sweetness and texture. However, you can also use Braeburn, Pink Lady, or Jonagold with excellent results.
Q: Can I use store-bought caramel sauce to save time?
Yes, but the flavor won’t be quite the same. If you do use store-bought, look for a high-quality sauce made with real butter and cream, and add a pinch of flaky sea salt to taste.
Q: My caramel crystallized. What happened?
Sugar crystallization usually occurs when sugar crystals are reintroduced to the melting sugar. To prevent this, avoid stirring the sugar as it melts (just swirl the pan gently), and make sure your pan and utensils are completely clean and dry before starting.
Q: Can I make this dessert dairy-free?
While I haven’t personally tested a dairy-free version, you could experiment with dairy-free cream cheese, coconut cream instead of heavy cream, and plant-based butter. Just be aware that the texture and flavor will differ from the original.
Q: How far in advance can I make this cheesecake?
This cheesecake can be made up to 2 days in advance and stored in the refrigerator. Add the caramel drizzle shortly before serving for the best appearance.
Q: Can I skip the water bath step?
The water bath is crucial for achieving the proper texture and preventing cracks. While you can technically skip it, I strongly recommend using this method for the best results.
Q: My caramel sauce hardened in the refrigerator. How do I fix it?
This is normal! Simply warm it gently in the microwave in 10-second intervals, stirring between each, until it reaches your desired consistency.
A Seasonal Favorite With Year-Round Appeal
While I particularly love serving this Salted Caramel Apple Pie Cheesecake during fall when apples are at their peak and the warming flavors feel especially appropriate, the truth is that this dessert is a showstopper any time of year. I’ve brought it to summer potlucks, winter holiday gatherings, and springtime celebrations—always to rave reviews.
What makes this recipe truly special is how it brings people together. There’s something about presenting a multi-layered dessert that instantly creates a sense of occasion. When I set this cheesecake on the table, conversations pause, eyes widen, and for a moment, everyone is united in appreciation of something beautiful and delicious.
I encourage you to take your time with this recipe. Enjoy the process of creating each component and bringing them together. The methodical steps of baking can be wonderfully therapeutic, and the reward—that moment when someone takes their first bite and closes their eyes in pure enjoyment—is absolutely worth the effort.
Whether you’re an experienced baker or tackling a project like this for the first time, I hope this Salted Caramel Apple Pie Cheesecake brings as much joy to your table as it has to mine. Happy baking!