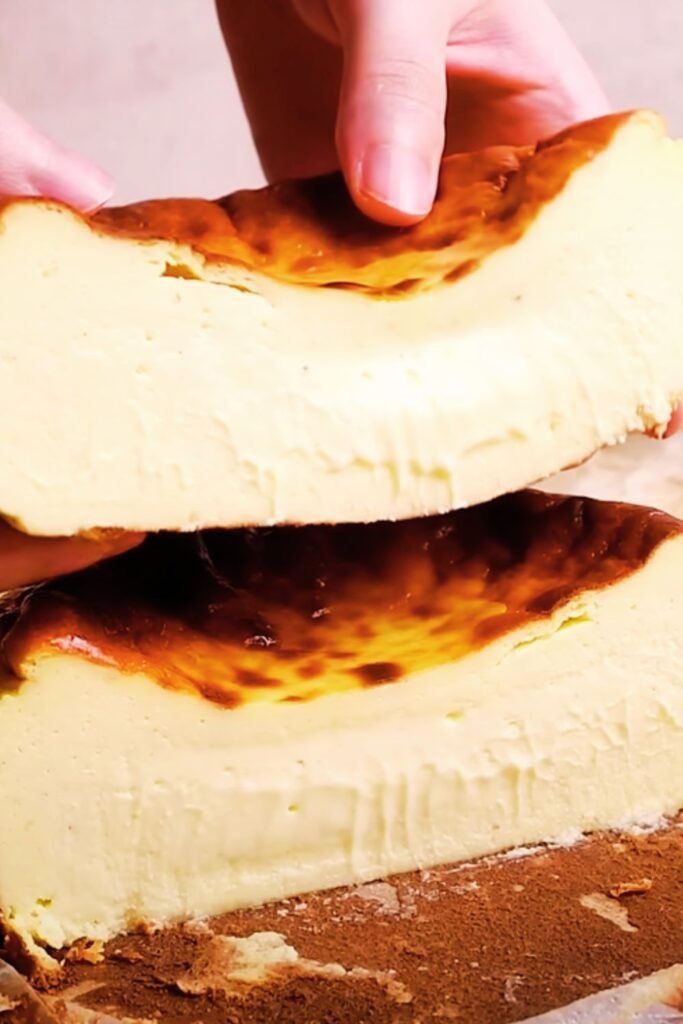
When I first laid eyes on a Basque burnt cheesecake, I was completely mesmerized. That dramatically caramelized, almost black top contrasting with the creamy, custard-like interior seemed like pure magic. After countless attempts and recipe refinements, I’ve discovered the secrets to creating the absolute best version of this iconic dessert that has taken the culinary world by storm.
The beauty of Basque cheesecake lies in its paradoxical nature – it’s simultaneously rustic and elegant, simple yet sophisticated. Unlike traditional New York-style cheesecake with its pristine appearance, this Spanish creation celebrates imperfection. The burnt exterior isn’t a mistake; it’s the whole point, creating layers of complex caramelized flavors that dance on your palate.
What Makes Basque Cheesecake Special
Basque Burnt Cheesecake (Tarta de Queso) : A crustless cheesecake originating from the Basque region of Spain, characterized by its intentionally burnt top and creamy, almost liquid center
Maillard Reaction : The chemical reaction between amino acids and sugars that creates the distinctive caramelized flavors and dark coloration on the cheesecake’s surface
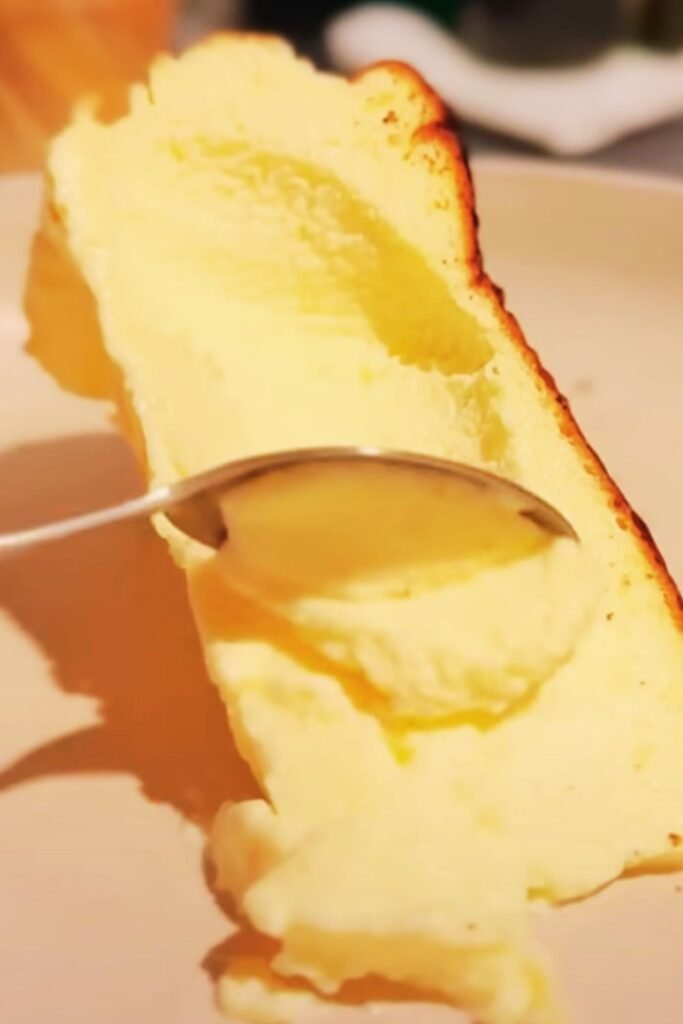
Jiggly Texture : The signature wobble of an properly baked Basque cheesecake, indicating the perfect balance between set exterior and custardy interior
What sets this cheesecake apart from its American cousin is the complete absence of a crust and the intentionally high baking temperature. Where traditional cheesecakes require water baths and gentle heat to prevent cracking, Basque cheesecake thrives on intense heat that creates its signature appearance and texture.
Essential Ingredients Breakdown
The magic of Basque cheesecake lies in its simplicity – just six ingredients create this masterpiece. However, the quality of each component directly impacts the final result.
| Ingredient | Quantity | Purpose | Quality Tips |
|---|---|---|---|
| Cream Cheese | 2 lbs (900g) | Main structure and flavor | Use full-fat, room temperature |
| Heavy Cream | 1 cup (240ml) | Creates silky texture | 35% fat content minimum |
| Large Eggs | 6 whole eggs | Binding and structure | Room temperature for better mixing |
| Granulated Sugar | ¾ cup (150g) | Sweetness and caramelization | Fine granulated works best |
| All-Purpose Flour | 3 tablespoons | Slight thickening | Sift to prevent lumps |
| Fine Sea Salt | ½ teaspoon | Flavor enhancement | Avoid table salt |
The cream cheese serves as the foundation, providing that rich, tangy flavor profile that makes cheesecake irresistible. I always emphasize using full-fat cream cheese – low-fat versions simply don’t have the richness needed for authentic results. The heavy cream transforms what could be a dense cake into something almost ethereal in texture.
My Foolproof Technique
After years of perfecting this recipe, I’ve developed a technique that delivers consistent results every time. The key lies in understanding that this isn’t just about following measurements – it’s about recognizing textures, temperatures, and timing cues that indicate perfection.
Preparation Phase
Before touching a single ingredient, I preheat my oven to 400°F (200°C). This aggressive temperature is non-negotiable for achieving the characteristic burnt top. I line a 10-inch springform pan with parchment paper, ensuring the paper extends well above the rim – this creates the rustic, wrinkled appearance that’s become synonymous with authentic Basque cheesecake.
The Mixing Method
My mixing technique has evolved through countless batches. I start by ensuring all ingredients reach room temperature – cold ingredients create lumps that never fully disappear, even with vigorous mixing.
- Cream cheese foundation: I beat the cream cheese until it’s completely smooth and lump-free. This takes longer than most people expect – usually 3-4 minutes of continuous beating.
- Sugar integration: Adding sugar gradually while beating ensures complete dissolution. I look for the mixture to become noticeably lighter in color.
- Egg incorporation: This is where many recipes fail. I add eggs one at a time, beating just until incorporated after each addition. Overbeating at this stage creates too much air, leading to cracks.
- Cream and flour finale: The heavy cream goes in slowly, followed by the sifted flour and salt. The final mixture should be silky smooth with no visible lumps.
Baking Mastery
The baking process is where science meets art. I’ve learned to read the visual cues that indicate perfect doneness – knowledge that only comes from making this cake dozens of times.
Temperature and Timing
| Baking Stage | Temperature | Time | Visual Cues |
|---|---|---|---|
| Initial Rise | 400°F (200°C) | 20 minutes | Puffing and beginning color |
| Caramelization | 400°F (200°C) | 35-45 minutes | Deep brown, almost black top |
| Center Check | N/A | Total 55-65 min | Slight jiggle in center only |
The exact timing varies based on your oven’s characteristics. I’ve learned that convection ovens may require slight temperature reduction, while older ovens might need extended time. The key indicator I watch for is the center jiggle – it should move like barely set custard, not liquid batter.
Common Baking Pitfalls
Through my experience, I’ve identified several critical mistakes that can ruin an otherwise perfect cheesecake:
- Insufficient browning: If your top isn’t deeply caramelized after an hour, increase temperature to 425°F for the final 10 minutes
- Overbaking: A completely firm center means you’ve gone too far – the residual heat will finish the cooking process
- Temperature shock: Never open the oven door during the first 45 minutes of baking
Cooling and Serving Perfection
The cooling process is just as crucial as the baking. I’ve learned that patience during this phase determines whether you’ll have a creamy masterpiece or a deflated disappointment.
I leave the cheesecake in the turned-off oven with the door slightly ajar for one hour. This gradual temperature reduction prevents the dramatic shrinkage that can occur with sudden temperature changes. After the oven cooling, I transfer it to room temperature for another hour before refrigerating.
The ideal serving temperature is slightly chilled but not ice-cold. I remove the cheesecake from the refrigerator 30 minutes before serving, allowing the flavors to bloom and the texture to achieve that perfect creamy consistency.
Flavor Variations and Enhancements
While purists might argue that classic Basque cheesecake needs no embellishment, I’ve developed several variations that complement rather than compete with the original’s beauty.
Subtle Flavor Additions
Vanilla Bean Enhancement : Scraping half a vanilla bean into the mixture adds floral notes without overwhelming the cheese flavor
Lemon Zest Brightness : One tablespoon of fresh lemon zest provides subtle citrus notes that cut through the richness
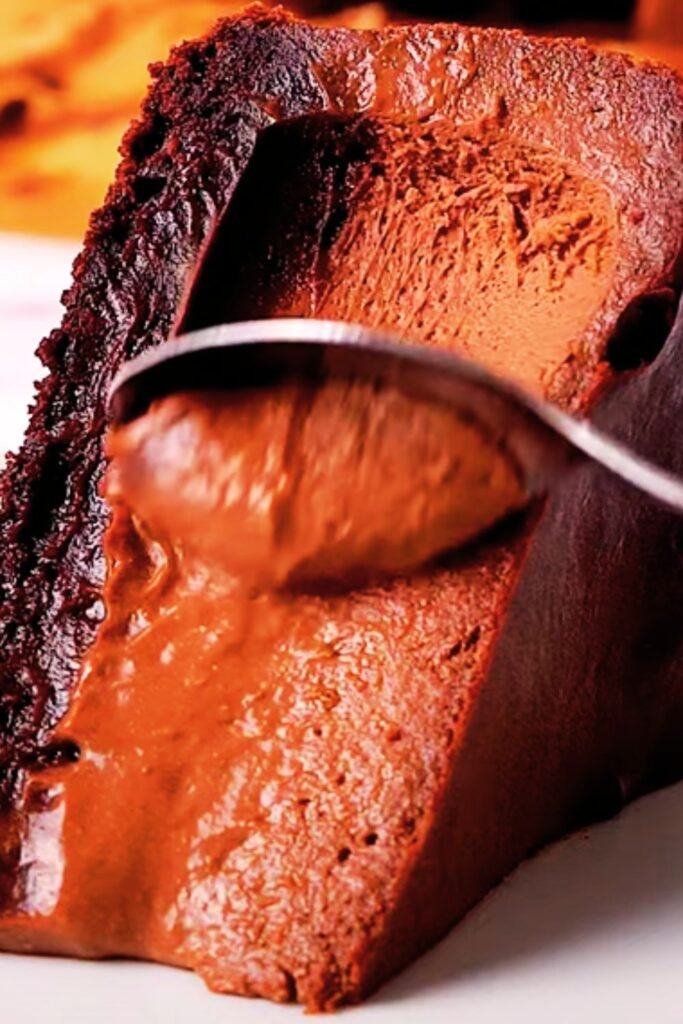
Coffee Depth : Two tablespoons of espresso powder create sophisticated mocha undertones
Honey Complexity : Replacing one-third of the sugar with honey adds floral sweetness and improves browning
Seasonal Adaptations
| Season | Addition | Quantity | Flavor Profile |
|---|---|---|---|
| Spring | Strawberry puree | ¼ cup | Fresh, fruity |
| Summer | Peach essence | 1 teaspoon | Light, aromatic |
| Fall | Cinnamon spice | 1 teaspoon | Warm, comforting |
| Winter | Orange zest | 2 tablespoons | Bright, festive |
Troubleshooting Common Issues
Over the years, I’ve encountered virtually every problem that can plague a Basque cheesecake baker. Here’s my troubleshooting guide based on real experience:
Texture Problems
Grainy texture: Usually indicates insufficient beating of cream cheese or cold ingredients. Solution: Start over with room temperature ingredients and beat cream cheese longer.
Too liquid center: Underbaking is the culprit. Return to oven and bake in 5-minute increments until slight jiggle remains.
Rubbery consistency: Overbeaten eggs incorporated too much air. Next time, mix eggs just until combined.
Cracked surface: While some cracking is normal, excessive cracking indicates temperature shock or overbaking.
Appearance Issues
The burnt top should be deep brown to nearly black – if yours is pale, your oven temperature may be too low or baking time insufficient. I’ve learned that different ovens require adjustments, and it’s better to err on the side of darker rather than lighter.
Storage and Make-Ahead Tips
Basque cheesecake actually improves with time, making it perfect for entertaining. I often make mine two days ahead, as the flavors meld and develop complexity during refrigeration.
Short-term storage: Wrapped well, it keeps in the refrigerator for up to one week. The texture remains perfect throughout this period.
Freezing guidelines: I’ve successfully frozen portions for up to three months. Wrap individual slices in plastic wrap, then aluminum foil. Thaw overnight in the refrigerator.
Serving from frozen: For unexpected guests, frozen slices can be served after 30 minutes at room temperature – they’ll have an almost ice cream-like consistency that’s surprisingly delightful.
Serving Suggestions and Pairings
The beauty of Basque cheesecake lies in its versatility. I’ve served it in countless contexts, from casual family dinners to elegant dinner parties.
Classic Presentations
- Simple elegance: A clean slice with a dusting of powdered sugar
- Berry accompaniment: Fresh berries provide acidic contrast to the rich cheese
- Caramel drizzle: Homemade salted caramel complements the burnt flavors
- Whipped cream dollop: Light, unsweetened whipped cream adds textural interest
Beverage Pairings
The rich, caramelized flavors pair beautifully with various beverages:
- Coffee: Espresso or strong coffee cuts through the richness
- Tea: Earl Grey or English Breakfast provide tannic balance
- Milk: Cold milk creates a nostalgic, comforting combination
- Sparkling water: Cleanses the palate between bites
Cultural Context and History
Understanding the cultural significance of this dessert has deepened my appreciation for its simplicity. Originating in the Basque region of Spain, specifically attributed to Santiago Rivera of La Viña restaurant in San Sebastián, this cheesecake represents a departure from traditional European dessert-making.
The Basque approach to cooking emphasizes letting ingredients shine through minimal manipulation – a philosophy perfectly embodied in this cheesecake. There’s no attempt to hide imperfections or create artificial perfection. Instead, the burnt exterior becomes a badge of authenticity.
Professional Tips from My Kitchen
After making hundreds of these cheesecakes, I’ve developed several professional tricks that ensure success:
Room temperature ingredients: I cannot overemphasize this point. Cold cream cheese creates lumps, cold eggs don’t incorporate smoothly, and the mixing process becomes laborious.
Parchment paper technique: I crumple the parchment paper before lining the pan. This creates natural folds that contribute to the rustic appearance.
Oven positioning: I always bake on the middle rack. Too high and the top burns before the center sets; too low and browning is insufficient.
Visual doneness cues: The perfect cheesecake will have a deep brown top with slight jiggle in just the center portion when gently shaken.
Nutritional Considerations
While this isn’t a health food, understanding its nutritional profile helps with portion planning and dietary considerations.
| Nutrient | Per Slice (1/12 cake) | Daily Value % |
|---|---|---|
| Calories | 385 | 19% |
| Total Fat | 34g | 44% |
| Saturated Fat | 21g | 105% |
| Cholesterol | 185mg | 62% |
| Sodium | 285mg | 12% |
| Carbohydrates | 14g | 5% |
| Protein | 8g | 16% |
The high fat content contributes to the luxurious mouthfeel, while the protein from eggs and cheese provides satiety. I recommend serving smaller portions alongside fresh fruit to balance the richness.
Questions and Answers
Q: Why is my Basque cheesecake not browning enough on top?
My experience has taught me that insufficient browning usually indicates either too low an oven temperature or inadequate baking time. I recommend increasing the temperature to 425°F for the final 10-15 minutes if your cheesecake isn’t achieving that signature deep caramelization. Also, ensure your oven rack is positioned in the center – too low and the top won’t brown properly.
Q: How do I know when the cheesecake is perfectly done?
The perfect doneness indicator I’ve learned to recognize is a slight jiggle in just the center portion when you gently shake the pan. The edges should be completely set, and the top should be deeply caramelized, almost black in places. The center should move like thick custard, not liquid batter. This usually occurs between 55-65 minutes of baking at 400°F.
Q: Can I make this cheesecake without a springform pan?
While I strongly recommend a springform pan for easiest removal, I have successfully made this in a regular 9-inch round cake pan lined with parchment paper with long overhangs for lifting. The key is ensuring you can remove the cheesecake without breaking it. A springform pan with parchment lining is really the gold standard for this recipe.
Q: Why did my cheesecake crack excessively on top?
Some cracking is completely normal and even desirable in Basque cheesecake, but excessive cracking usually indicates temperature shock or overbaking. I’ve found that opening the oven door during baking, moving from a very hot oven to a cold environment too quickly, or baking beyond the proper doneness point causes problematic cracking. Follow my cooling method of leaving it in the turned-off oven with the door ajar.
Q: How long does this cheesecake keep, and does it freeze well?
In my experience, this cheesecake keeps beautifully in the refrigerator for up to one week when properly wrapped. It actually improves after a day or two as the flavors meld. For freezing, I wrap individual slices in plastic wrap then aluminum foil – they keep for up to three months. Thaw overnight in the refrigerator, though I’ve discovered that partially thawed slices have an interesting ice cream-like texture that’s quite enjoyable.
Q: What’s the difference between this and regular New York cheesecake?
The fundamental differences I’ve observed are numerous: Basque cheesecake has no crust, uses a much higher baking temperature, celebrates the burnt exterior rather than avoiding it, has a more liquid center, and requires no water bath. The texture is more custard-like and less dense than New York style. The flavor profile is also more caramelized due to the high-heat baking method.
Q: Can I reduce the sugar in this recipe?
I’ve experimented with sugar reduction, and while you can decrease it slightly, I don’t recommend going below ½ cup total. The sugar not only provides sweetness but also contributes to the browning reaction that creates the signature appearance. Less sugar means less caramelization and a paler top. If you want to reduce sweetness, I suggest serving with tart accompaniments like fresh berries rather than modifying the recipe.
Q: My cheesecake center is still very jiggly after the recommended baking time. Should I continue baking?
The center should have a slight jiggle – this is correct! However, if it’s moving like liquid batter rather than set custard, continue baking in 5-minute increments. I’ve learned that it’s better to slightly overbake than underbake, as the residual heat continues cooking during the cooling process. The texture should be similar to thick pudding when done.
This Basque burnt cheesecake represents everything I love about baking – the intersection of technique and intuition, the celebration of imperfection, and the magic that happens when simple ingredients are treated with respect and understanding. Every time I make one, I’m reminded why this dessert has captured hearts worldwide. The burnt exterior tells a story of bold flavor choices, while the creamy interior delivers pure comfort. It’s a dessert that encourages us to embrace the beautifully imperfect, and in my kitchen, that philosophy extends far beyond just this one remarkable cake.