When I first encountered Esterhazy Torte in a charming Budapest café, I knew I had discovered something extraordinary. This magnificent Hungarian cake, with its delicate hazelnut layers and rich chocolate buttercream, represents the pinnacle of Central European pastry artistry. Named after the influential Esterhazy family, this dessert has graced royal tables for centuries and continues to captivate dessert lovers worldwide.
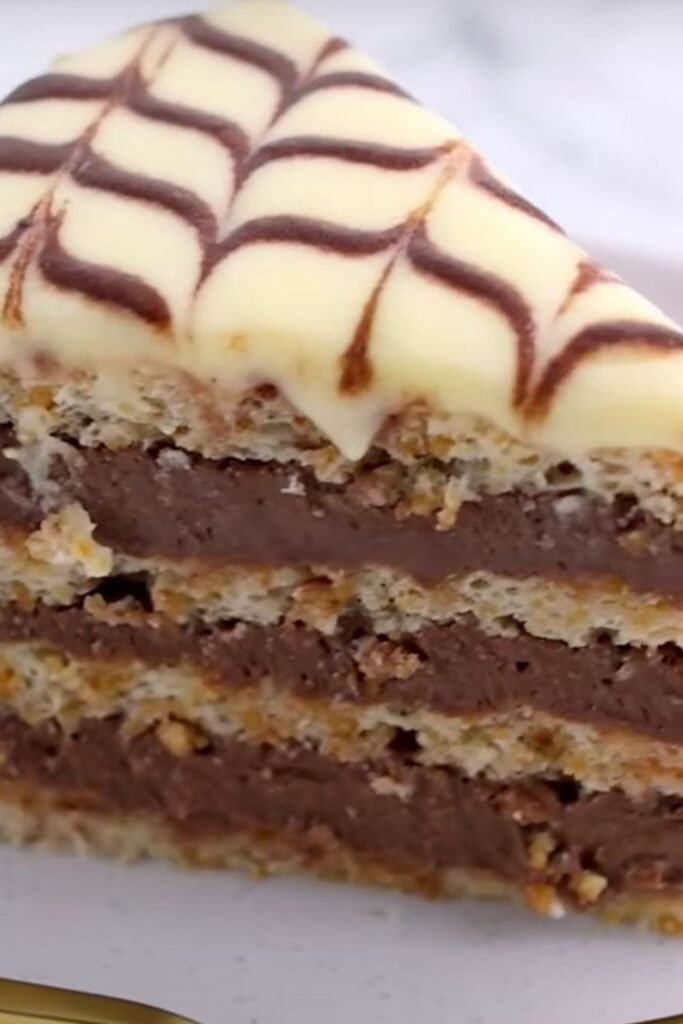
The Esterhazy Torte isn’t just another cake – it’s a testament to the sophisticated baking traditions of the Austro-Hungarian Empire. What sets this dessert apart is its unique combination of nutty meringue layers, velvety buttercream, and the distinctive feathered chocolate pattern that crowns each slice. Every bite delivers a symphony of textures and flavors that dance on your palate.
Understanding the Esterhazy Legacy
The Esterhazy Torte originated in the 19th century, created to honor Prince Paul III Anton Esterhazy de Galantha, a prominent figure in Hungarian nobility. This cake represents more than just a dessert; it embodies the opulence and refinement of imperial Austrian cuisine. The original recipe called for ground hazelnuts, which were abundant in the region, combined with French patisserie techniques that had been adopted by Hungarian bakers.
What makes this torte particularly special is its construction method. Unlike traditional sponge cakes, the Esterhazy employs a meringue-based approach that creates incredibly light, airy layers. These delicate sheets are then assembled with rich buttercream, creating a cake that’s both substantial and ethereal.
Essential Ingredients and Their Roles
Understanding each component’s purpose will help you achieve the perfect Esterhazy Torte:
Hazelnuts (Ground) : The foundation of flavor, providing nutty richness and structural integrity to the meringue layers. I prefer using freshly ground hazelnuts for maximum flavor impact.
Egg Whites : Create the light, airy texture of the meringue layers. Room temperature whites whip better and create more stable peaks.
Granulated Sugar : Sweetens and stabilizes the meringue while contributing to the cake’s tender crumb structure.
Powdered Sugar : Used in both meringue and buttercream for smooth texture and easy incorporation.
Butter (Unsalted) : Forms the base of the rich buttercream filling that binds the layers together.
Dark Chocolate : Provides deep flavor complexity and creates the signature decorative pattern on top.
Vanilla Extract : Enhances overall flavor profile without overpowering the delicate hazelnut notes.
Cognac or Rum (Optional) : Adds sophisticated depth to the buttercream, though you can substitute with vanilla for alcohol-free version.
Equipment You’ll Need
| Equipment | Purpose | Alternative Options |
|---|---|---|
| Stand Mixer | Whipping meringue and buttercream | Hand mixer (requires more time) |
| Kitchen Scale | Precise measurements | Measuring cups (less accurate) |
| 9-inch Springform Pan | Baking meringue layers | Regular cake pan with parchment |
| Offset Spatula | Smooth frosting application | Large knife or spoon |
| Piping Bag | Creating chocolate design | Zip-lock bag with corner cut |
| Wire Cooling Racks | Proper cooling | Clean towels on counter |
Step-by-Step Preparation Method
Preparing the Hazelnut Meringue Layers
I always start by preparing my workspace and ingredients. Preheat your oven to 300°F (150°C) and line three baking sheets with parchment paper. Draw 9-inch circles on each parchment sheet using a cake pan as a guide, then flip the paper so the pencil marks don’t transfer to your meringue.
Begin by grinding 2 cups of hazelnuts in a food processor until they reach a fine, flour-like consistency. Be careful not to over-process, as this can create hazelnut butter. The texture should resemble coarse flour with no large chunks remaining.
In your stand mixer bowl, whip 6 large egg whites until they form soft peaks. This usually takes about 3-4 minutes on medium speed. Gradually add 1½ cups of granulated sugar, continuing to whip until stiff, glossy peaks form. The meringue should hold its shape when you lift the beaters.
Gently fold the ground hazelnuts into the meringue using a large spatula. Use a folding motion rather than stirring to maintain the air you’ve incorporated. The mixture should be uniform but still light and airy.
Divide the meringue mixture evenly among your three prepared baking sheets, spreading it within the drawn circles. Use an offset spatula to create smooth, even layers about ¼ inch thick. The edges should be slightly thicker to prevent breaking.
Bake for 25-30 minutes, rotating the pans halfway through. The meringue layers are done when they’re lightly golden and feel firm to the touch. They should lift easily from the parchment paper without sticking.
Creating the Chocolate Buttercream
While your meringue layers cool, prepare the buttercream. Start by melting 6 ounces of dark chocolate in a double boiler or microwave, stirring until smooth. Allow it to cool slightly while you prepare the butter base.
In your stand mixer, cream 1 cup of unsalted butter until light and fluffy, about 5 minutes. Gradually add 2 cups of powdered sugar, beating until smooth and well combined. The mixture should be pale and creamy.
Slowly pour the melted chocolate into the butter mixture while the mixer runs on low speed. Add 2 teaspoons of vanilla extract and 2 tablespoons of cognac if using. Beat until the buttercream is smooth and holds its shape.
Assembly Process
Place your first meringue layer on your serving plate. Spread one-third of the chocolate buttercream evenly across the surface, leaving a small border around the edges. The buttercream will spread slightly under the weight of the next layer.
Carefully place the second meringue layer on top, pressing gently to adhere. Spread another third of the buttercream over this layer. Top with the final meringue layer and use the remaining buttercream to cover the top surface.
For the signature Esterhazy pattern, melt 2 ounces of white chocolate and transfer it to a piping bag or squeeze bottle. Create concentric circles on the dark chocolate surface, then use a toothpick to draw lines from the center to the edge, creating the classic feathered pattern.
Nutritional Information and Serving Details
| Nutritional Component | Per Slice (12 servings) | Daily Value % |
|---|---|---|
| Calories | 485 | 24% |
| Total Fat | 32g | 41% |
| Saturated Fat | 15g | 75% |
| Cholesterol | 65mg | 22% |
| Sodium | 85mg | 4% |
| Carbohydrates | 48g | 16% |
| Dietary Fiber | 3g | 12% |
| Sugars | 44g | – |
| Protein | 8g | 16% |
Storage and Make-Ahead Tips
The Esterhazy Torte actually improves with time, making it an excellent make-ahead dessert. Store the assembled cake covered in the refrigerator for up to 5 days. The meringue layers will soften slightly, creating the perfect tender texture that characterizes a well-aged Esterhazy.
For longer storage, you can freeze the individual meringue layers wrapped in plastic wrap for up to 3 months. The buttercream can be made up to a week in advance and stored in the refrigerator. Let it come to room temperature and re-whip before using.
I recommend making this cake at least 24 hours before serving. This resting period allows the flavors to meld and the textures to achieve their optimal balance. The contrast between the slightly chewy meringue and the rich buttercream becomes more pronounced with time.
Troubleshooting Common Issues
Meringue Layers Crack During Baking Temperature too high or overbaked. Reduce oven temperature by 25°F and check doneness earlier.
Buttercream Won’t Come Together Chocolate may have been too hot when added. Let mixture cool and re-whip, or add a tablespoon of cold butter.
Layers Slide Apart Insufficient buttercream between layers or buttercream too soft. Chill assembled cake for 30 minutes before final decoration.
Hazelnut Mixture Too Oily Over-processed nuts release oils. Start with fresh nuts and pulse in short bursts.

Variations and Modern Adaptations
Almond Esterhazy
Replace hazelnuts with finely ground almonds for a different flavor profile. The technique remains identical, but the taste becomes more delicate and floral.
Chocolate-Free Version
Create a vanilla buttercream using the same base but omitting the chocolate. Add extra vanilla extract and a touch of almond extract for complexity.
Individual Portions
Use ring molds to create personal-sized Esterhazy tortes. This presentation works beautifully for dinner parties and allows for more precise portion control.
Gluten-Free Adaptation
The traditional recipe is naturally gluten-free, making it perfect for guests with celiac disease or gluten sensitivity.
Serving Suggestions and Presentation
The Esterhazy Torte deserves an elegant presentation that honors its royal heritage. I prefer serving it on fine china with a silver cake server, allowing each guest to admire the intricate layers before taking their first bite.
Accompany each slice with a small dollop of unsweetened whipped cream to balance the richness, and consider adding fresh berries for color contrast and acidity. A light dusting of cocoa powder around the plate edge creates a professional finish.
For special occasions, I like to garnish with candied hazelnuts or chocolate curls. These additions enhance both the visual appeal and reinforce the primary flavors of the torte.
Coffee pairs exceptionally well with Esterhazy Torte, as the bitter notes complement the sweet, nutty flavors. I particularly enjoy serving it with a robust espresso or a smooth medium roast that won’t overpower the delicate hazelnut notes.
Cultural Significance and Modern Relevance
In Hungarian culture, the Esterhazy Torte represents celebration and sophistication. It’s traditionally served at weddings, anniversaries, and other significant life events. The time-intensive preparation demonstrates care and respect for guests, making it a meaningful choice for special occasions.
Today’s home bakers are rediscovering this classic, drawn to its impressive appearance and complex flavors. Unlike trendy desserts that come and go, the Esterhazy Torte has maintained its appeal for over two centuries, testament to its perfect balance of technique and taste.
The cake also represents the beautiful fusion of cultures that characterized the Austro-Hungarian Empire. French pastry techniques combined with local ingredients and Hungarian sensibilities created something entirely unique and enduring.
Professional Tips for Perfect Results
Through years of making this torte, I’ve learned several crucial techniques that separate good from exceptional results. First, always weigh your ingredients rather than using volume measurements. Baking is science, and precision matters enormously with delicate preparations like meringue.
Second, pay attention to humidity levels. Meringue-based desserts perform best on dry days. If you must bake during humid weather, add an extra 5-10 minutes to the baking time and ensure your oven door remains closed throughout the process.
Temperature control is critical throughout the process. Your egg whites should be at room temperature for optimal volume, but your butter should be properly softened – pliable but not melted. The chocolate must be completely cooled before adding to prevent the buttercream from breaking.
Finally, patience is your greatest tool. Rushing any step, from whipping meringue to cooling layers, will compromise your final result. The Esterhazy Torte rewards careful, methodical preparation with unparalleled flavor and texture.
Questions and Answers
Q: Can I substitute other nuts for hazelnuts in this recipe?
I’ve successfully made this torte with almonds, walnuts, and even pistachios. Each nut brings its own character to the dessert. Almonds create a more delicate flavor, while walnuts add earthiness. Whatever nut you choose, ensure it’s finely ground and fresh for the best results.
Q: How far in advance can I make the meringue layers?
You can prepare the meringue layers up to one week ahead if stored properly. Wrap each layer individually in plastic wrap and store in an airtight container at room temperature. This actually works to your advantage, as slightly aged meringue layers often have better texture than fresh ones.
Q: What’s the best way to achieve clean, even slices?
Use a sharp, thin-bladed knife dipped in warm water between cuts. Wipe the blade clean after each slice to prevent dragging buttercream. I also recommend chilling the assembled torte for at least 2 hours before slicing, which firms up the buttercream and makes cleaner cuts possible.
Q: Can I make this recipe dairy-free?
Yes, you can substitute high-quality vegan butter for regular butter in the buttercream. The texture may be slightly different, but the flavor remains excellent. Ensure your vegan butter is at the proper temperature for best whipping results.
Q: Why did my chocolate buttercream turn grainy?
Grainy buttercream usually results from temperature issues. Either the chocolate was too hot when added, or the butter was too cold. To fix it, try placing the bowl over a warm water bath for a few seconds while whipping, or add a tablespoon of room temperature butter and continue beating.
Q: How do I prevent the meringue layers from becoming soggy?
Proper storage is key. Keep the assembled torte covered but not airtight – I use a cake dome with slight ventilation. Also, ensure your meringue layers are completely cool before assembly, and don’t over-moisten with any liquid ingredients.
Q: Can I freeze the completed torte?
While possible, I don’t recommend freezing the assembled torte as the texture changes significantly. Instead, freeze the individual components separately. The meringue layers freeze beautifully for up to 3 months, and you can make fresh buttercream when ready to assemble.
Q: What’s the secret to getting the perfect chocolate feather pattern on top?
The key is using chocolate at the right consistency – it should flow smoothly but not be too thin. Start with concentric circles, then draw your toothpick from center to edge in straight lines, alternating direction for each line. Work quickly before the chocolate sets, and don’t press too hard to avoid disturbing the buttercream underneath.