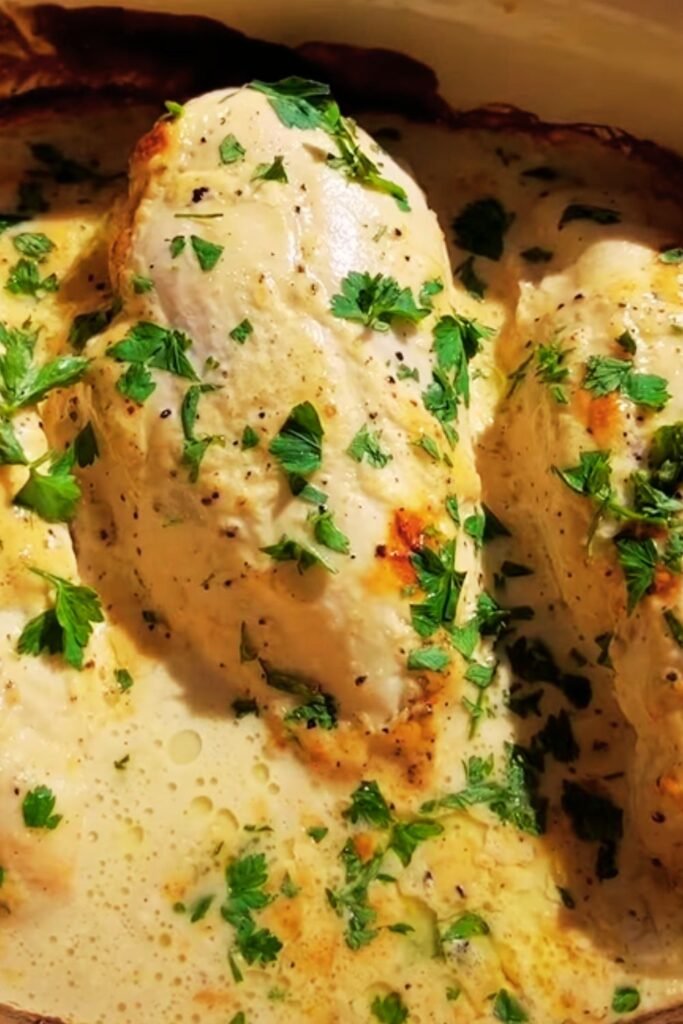
When I’m craving comfort food that doesn’t require hours in the kitchen, this Baked Caesar Chicken recipe is my go-to solution. I discovered this dish during a particularly hectic week when I needed something impressive yet simple, and it’s been a staple in my dinner rotation ever since. The tangy Caesar dressing creates a flavorful marinade that keeps the chicken incredibly juicy, while the Parmesan and panko coating delivers that perfect golden crunch we all love.
What makes this recipe truly special is how it transforms everyday ingredients into something restaurant-worthy in just 30 minutes. Whether you’re cooking for picky eaters, hosting an impromptu dinner party, or simply treating yourself after a long day, this dish strikes that perfect balance between effort and reward.
Ingredients You’ll Need
For the chicken:
- 4 boneless, skinless chicken breasts (about 2 pounds)
- 1 cup Caesar dressing (good quality store-bought or homemade)
- 1 cup panko breadcrumbs
- ½ cup grated Parmesan cheese
- 2 tbsp Italian seasoning
- 1 tsp garlic powder
- ½ tsp black pepper
- ¼ tsp salt
- 2 tbsp olive oil
- Fresh parsley for garnish
For homemade Caesar dressing (optional):
- 2 cloves garlic, minced
- 1 tsp anchovy paste (or 2 anchovy fillets, minced)
- 2 tbsp fresh lemon juice
- 1 tsp Dijon mustard
- ½ cup mayonnaise
- ⅓ cup grated Parmesan cheese
- 2 tbsp olive oil
- ¼ tsp black pepper
Essential Tools
Before diving into the cooking process, I always make sure I have these tools ready:
- Shallow baking dish
- Two mixing bowls
- Measuring cups and spoons
- Meat thermometer
- Parchment paper
- Rimmed baking sheet
- Tongs
- Sharp knife and cutting board
Step-by-Step Instructions
Preparing the Chicken
- Preheat your oven to 425°F (220°C) and line a rimmed baking sheet with parchment paper.
- If your chicken breasts are very thick, I recommend butterflying them or pounding them to an even thickness of about ¾-inch. This ensures even cooking and a better coating-to-meat ratio.
- Pat the chicken breasts dry with paper towels. This crucial step helps the Caesar dressing stick better to the surface.
- Season both sides of the chicken with a pinch of salt and pepper. Remember that both the dressing and Parmesan contain salt, so go easy here.
Creating the Perfect Coating
- Pour the Caesar dressing into a shallow bowl. If making homemade dressing, simply whisk all dressing ingredients together until smooth.
- In another bowl, combine the panko breadcrumbs, grated Parmesan cheese, Italian seasoning, garlic powder, black pepper, and salt. Mix thoroughly to ensure even distribution of flavors.
- Add the olive oil to the breadcrumb mixture and stir until the crumbs are lightly coated. This helps achieve that gorgeous golden-brown color during baking.
The Coating Process
- Dip each chicken breast completely in the Caesar dressing, allowing excess to drip off. Make sure to coat all sides evenly.
- Press the chicken into the breadcrumb mixture, flipping to coat both sides. Use your fingers to press the coating firmly onto the chicken to ensure it sticks well.
- Place the coated chicken breasts on the prepared baking sheet, leaving at least an inch of space between each piece.

Baking to Perfection
- Bake the chicken in the preheated oven for 22-25 minutes, until the coating is golden brown and crispy.
- The most reliable way to check doneness is with a meat thermometer — the internal temperature should reach 165°F (74°C) at the thickest part.
- Once done, let the chicken rest for 5 minutes before slicing. This allows the juices to redistribute throughout the meat.
- Garnish with freshly chopped parsley and lemon wedges for a bright finish.
Why This Recipe Works
What I love most about this Baked Caesar Chicken is the science behind its deliciousness. The mayonnaise base in Caesar dressing serves two important functions: it locks in moisture and helps the breadcrumbs adhere to the chicken. The high oven temperature quickly crisps the exterior while keeping the interior juicy.
The combination of Parmesan cheese and panko creates a perfectly textured crust. Parmesan adds a savory depth and helps with browning, while panko breadcrumbs stay crispier than traditional breadcrumbs because of their larger, airier structure.
Adding a small amount of oil to the breadcrumb mixture before baking is my secret weapon. This pre-coating of fat helps the breadcrumbs brown evenly without having to flip the chicken or spray it with cooking spray.
Nutritional Information
For those keeping an eye on their intake, here’s a detailed breakdown of what you’re getting per serving (based on one chicken breast):
| Nutrient | Amount | % Daily Value* |
|---|---|---|
| Calories | 425 | – |
| Total Fat | 24g | 31% |
| – Saturated Fat | 5g | 25% |
| – Trans Fat | 0g | – |
| Cholesterol | 125mg | 42% |
| Sodium | 780mg | 34% |
| Total Carbohydrates | 12g | 4% |
| – Dietary Fiber | 1g | 4% |
| – Sugars | 1g | – |
| Protein | 39g | 78% |
| Vitamin D | 0.2mcg | 1% |
| Calcium | 210mg | 16% |
| Iron | 1.8mg | 10% |
| Potassium | 520mg | 11% |
*Percent Daily Values are based on a 2,000 calorie diet.
Common Mistakes to Avoid
Through my many times making this dish, I’ve encountered a few pitfalls that are easily avoided:
- Skipping the drying step: Wet chicken won’t hold the coating as well. Always pat your chicken dry before seasoning.
- Not pounding the chicken: Uneven thickness leads to overcooked thin parts and undercooked thick parts.
- Overcrowding the pan: Give each piece of chicken enough space so that hot air can circulate around it, creating that perfect crispiness.
- Opening the oven too often: Each time you peek, the temperature drops, affecting the cooking time and crispiness.
- Cutting into the chicken immediately: Let it rest for at least 5 minutes to keep all those delicious juices inside.
Variations to Try
Once you’ve mastered the basic recipe, try these delicious variations:
Spicy Caesar Chicken
Add 1-2 teaspoons of crushed red pepper flakes or 1 tablespoon of hot sauce to your Caesar dressing for a kick of heat.
Mediterranean Caesar Chicken
Mix 2 tablespoons of chopped sun-dried tomatoes and 1 tablespoon of chopped Kalamata olives into your breadcrumb mixture.
Herb-Loaded Caesar Chicken
Add ¼ cup of freshly chopped herbs like basil, oregano, and thyme to the breadcrumb mixture for a fragrant twist.
Caesar Chicken Tenders
Cut chicken breasts into strips before coating and reduce the baking time to 15-18 minutes for perfect chicken tenders.

Serving Suggestions
To create a complete meal, I like to pair this Baked Caesar Chicken with:
- A classic Caesar salad (naturally!)
- Roasted garlic mashed potatoes
- Steamed asparagus with lemon
- Garlic bread or dinner rolls
- Lemon orzo pasta
- Mediterranean quinoa salad
- Roasted brussels sprouts with balsamic glaze
- Fresh cucumber and tomato salad
For a lighter option, slice the chicken and serve it on top of a hearty salad with romaine lettuce, cherry tomatoes, and additional Caesar dressing.
Make-Ahead and Storage Tips
Life gets busy, so here’s how to make this recipe work for your schedule:
Make-Ahead Options:
- Prepare the breadcrumb mixture up to 2 days in advance and store in an airtight container at room temperature.
- Mix the homemade Caesar dressing up to 3 days ahead and refrigerate.
- Pound and season the chicken the night before cooking, then store covered in the refrigerator.
Storage Instructions:
- Refrigerate leftovers in an airtight container for up to 3 days.
- Freeze cooked chicken for up to 2 months. Wrap individual pieces in foil, then place in a freezer bag.
- For best results, thaw frozen chicken overnight in the refrigerator.
Reheating Methods:
- Oven: Reheat at 350°F for 10-15 minutes until warmed through.
- Air fryer: 3-4 minutes at 350°F for the crispiest results.
- Microwave: Use 50% power in 30-second intervals (though this method won’t maintain the crispiness).
Budget-Friendly Tips
This recipe doesn’t have to break the bank. Here are my money-saving strategies:
- Buy chicken in bulk when it’s on sale and freeze portions for later use.
- Make your own Caesar dressing—it’s cheaper and tastier than most store-bought versions.
- Look for Parmesan cheese on sale and grate it yourself instead of buying pre-grated.
- Substitute regular breadcrumbs mixed with a teaspoon of olive oil if panko is unavailable or more expensive.
- Grow parsley and other herbs on your windowsill for fresh garnishes without the grocery store markup.
Expert Tips for Success
After making this recipe countless times, I’ve picked up some professional tricks:
- Temperature matters: Let chicken sit at room temperature for 15 minutes before cooking for more even results.
- Check for doneness at the 20-minute mark: Ovens vary, and chicken breasts come in different sizes.
- Let the breadcrumb coating “set”: After coating the chicken, let it sit for 5 minutes before baking to help the coating adhere better.
- Use freshly grated Parmesan: Pre-grated cheese contains anti-caking agents that affect flavor and melting.
- Season each layer: A pinch of salt and pepper on the chicken before coating adds depth of flavor.

Frequently Asked Questions
Can I use chicken thighs instead of breasts? Absolutely! Boneless, skinless chicken thighs work wonderfully in this recipe. They’re naturally juicier but will need slightly longer cooking time—about 28-30 minutes. Just make sure they reach 165°F internal temperature.
What if I don’t have Caesar dressing? In a pinch, you can substitute Greek yogurt mixed with a bit of garlic powder, lemon juice, and Worcestershire sauce. The flavor won’t be identical, but it will create a similar tangy base for the breadcrumbs to adhere to.
Is there a gluten-free option? Yes! Replace panko breadcrumbs with gluten-free breadcrumbs or crushed pork rinds for a zero-carb option. Just make sure your Caesar dressing is also gluten-free (some contain wheat-based ingredients).
Can I make this dairy-free? It’s possible, but the flavor profile will change. Use a dairy-free Caesar dressing and substitute nutritional yeast for the Parmesan cheese. The coating won’t brown as beautifully but will still be tasty.
How can I tell if the chicken is cooked without a meat thermometer? Cut into the thickest part of the chicken—the juices should run clear with no pink color. The meat should be opaque white throughout. However, I strongly recommend investing in an inexpensive meat thermometer for perfect results every time.
Can I use this recipe for meal prep? Definitely! This chicken maintains its flavor well for 3-4 days in the refrigerator, making it perfect for weekly meal preparation. For best texture, reheat in an oven or air fryer rather than microwave.
What’s the best way to keep the coating from falling off? Make sure to pat the chicken very dry before coating, press the breadcrumb mixture firmly onto all sides, and don’t move the chicken around too much once it’s on the baking sheet. Letting it sit for 5 minutes before baking also helps the coating set.
Can I add vegetables to the same pan? If your baking sheet is large enough, you can add quick-cooking vegetables like asparagus or cherry tomatoes during the last 10 minutes of baking. For root vegetables that take longer to cook, I recommend roasting them on a separate pan to ensure even cooking of all components.
Final Thoughts
Baked Caesar Chicken has become my signature dish for a reason. It perfectly balances ease and elegance, making it suitable for both weeknight dinners and special occasions. The recipe’s versatility allows for countless variations to match your family’s preferences or what you happen to have in your pantry.
What I find most satisfying about this dish is how it transforms a salad dressing—something we typically think of as a condiment—into the star flavor component of a main course. It’s a reminder that cooking doesn’t always have to be complicated to be remarkable.
So the next time you’re staring at chicken breasts wondering how to make them exciting, remember this recipe. With its crispy exterior, juicy interior, and complex flavor profile, it might just become your new go-to dinner option too.
Give it a try, and I’d love to know what variations you create to make it your own!