I’ve been perfecting my Black Forest Gateau recipe for over a decade, and I can honestly say there’s nothing quite like the moment when you cut into that first slice. The combination of rich chocolate sponge, tart cherries, and billowy whipped cream creates a symphony of flavors that transport you straight to the heart of Germany’s Black Forest region.
This iconic dessert, known as Schwarzwälder Kirschtorte in German, has captured hearts worldwide with its dramatic presentation and irresistible taste. Today, I’m sharing my foolproof recipe that guarantees bakery-quality results every single time.
The Story Behind Black Forest Gateau
My fascination with Black Forest Gateau began during my first trip to the Schwarzwald region in Germany. I watched local bakers craft this masterpiece with such precision and passion that I knew I had to master it myself. The dessert’s origins trace back to the 1930s, though the exact creator remains a delicious mystery.
What I discovered during my research is that authentic Black Forest Gateau requires specific ingredients and techniques that many home bakers overlook. The key lies in understanding each component’s role in creating the perfect balance of flavors and textures.
Essential Ingredients for Authentic Black Forest Gateau
Chocolate Sponge Components
- Cocoa Powder: I always use high-quality Dutch-processed cocoa for the deepest chocolate flavor
- Eggs: Room temperature eggs create better volume and texture
- Sugar: Caster sugar dissolves more easily than granulated
- Flour: Plain flour works best for the tender crumb
Cherry Layer Essentials
- Sour Cherries: Fresh or jarred Morello cherries provide the authentic tartness
- Kirschwasser: This cherry brandy is non-negotiable for true authenticity
- Cherry Juice: Reserved from the jar for extra flavor intensity
Cream and Assembly
- Heavy Cream: Minimum 35% fat content for stable whipping
- Powdered Sugar: Prevents grittiness in the whipped cream
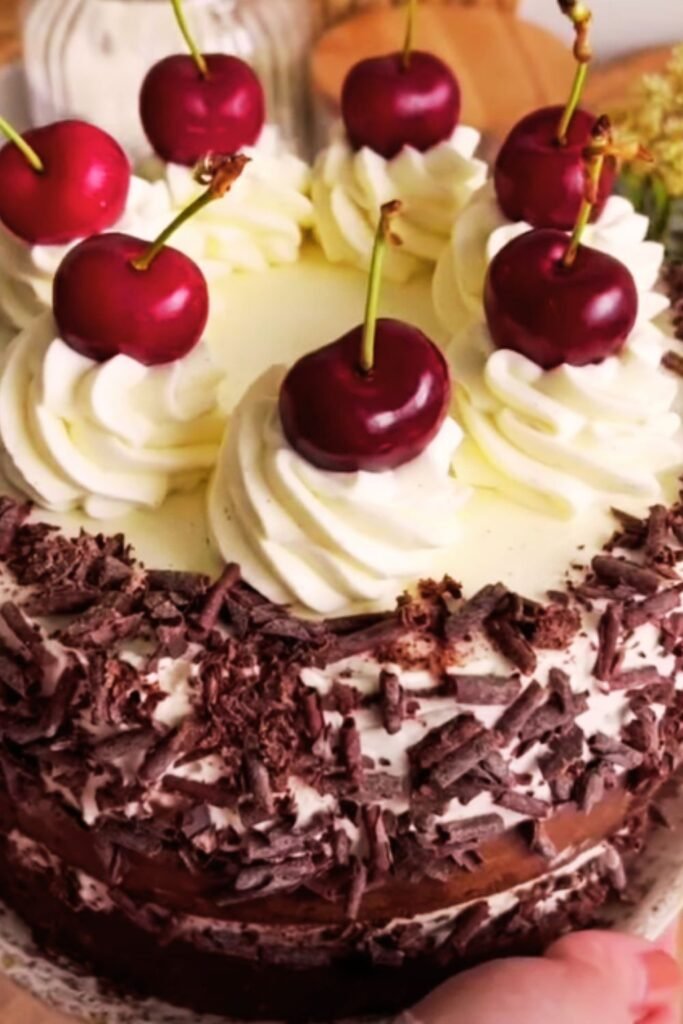
- Dark Chocolate: For shaving and decoration
My Foolproof Black Forest Gateau Recipe
Chocolate Sponge Preparation
I start by preheating my oven to 180°C (160°C fan) and preparing three 20cm round cake tins. The secret to my sponge’s success lies in the whisking technique I developed over years of practice.
Dry Ingredients:
- 200g caster sugar
- 150g plain flour
- 50g cocoa powder
- 1 tsp baking powder
- ½ tsp salt
Wet Ingredients:
- 6 large eggs
- 100ml sunflower oil
- 100ml hot water
- 1 tsp vanilla extract
I begin by whisking the eggs and sugar until they reach the ribbon stage – this takes about 8-10 minutes with an electric mixer. The mixture should be pale, thick, and leave a trail when the beaters are lifted.
Next, I sift together all dry ingredients three times. This might seem excessive, but it ensures the lightest possible sponge. I fold the dry ingredients into the egg mixture using a large metal spoon, working in thirds to maintain the air I’ve carefully incorporated.
The hot water comes last, mixed with oil and vanilla. I add this slowly while folding gently – this step creates the moist texture that makes my sponge stand out from others.
Baking and Cooling Process
I divide the batter evenly between my prepared tins and bake for 25-30 minutes. The key indicator I look for is when the sponge springs back lightly when touched and starts pulling away from the tin edges.
Cooling is crucial – I leave the cakes in their tins for 10 minutes before turning them onto wire racks. This prevents the delicate sponge from breaking while still warm.
Cherry Preparation and Flavor Enhancement
Processing the Cherries
I drain my jar of Morello cherries, reserving every drop of that precious juice. If you’re using fresh cherries, you’ll need to stone them and create a light syrup by cooking them briefly with sugar.
The cherries get a generous splash of Kirschwasser – about 3-4 tablespoons. I let them macerate for at least 30 minutes, but overnight is even better. This step intensifies the cherry flavor and adds that distinctive kick that makes Black Forest Gateau so special.
Creating the Cherry Syrup
I combine the reserved cherry juice with an equal amount of Kirschwasser and a tablespoon of sugar. This syrup gets brushed onto each sponge layer, adding moisture and flavor that penetrates deep into the cake.
Whipped Cream Mastery
Achieving Perfect Consistency
My whipped cream technique ensures it holds its shape for days without weeping. I start with 600ml of heavy cream, chilled overnight along with my bowl and beaters.
I add 3 tablespoons of powdered sugar and 1 teaspoon of vanilla extract before whipping. The key is to stop at soft peaks – over-whipped cream becomes grainy and separates.
Stabilizing the Cream
For extra stability, especially in warm weather, I add 1 teaspoon of gelatin dissolved in 2 tablespoons of warm water. This keeps the cream firm without affecting the taste.
Assembly Techniques for Professional Results
Layer Construction
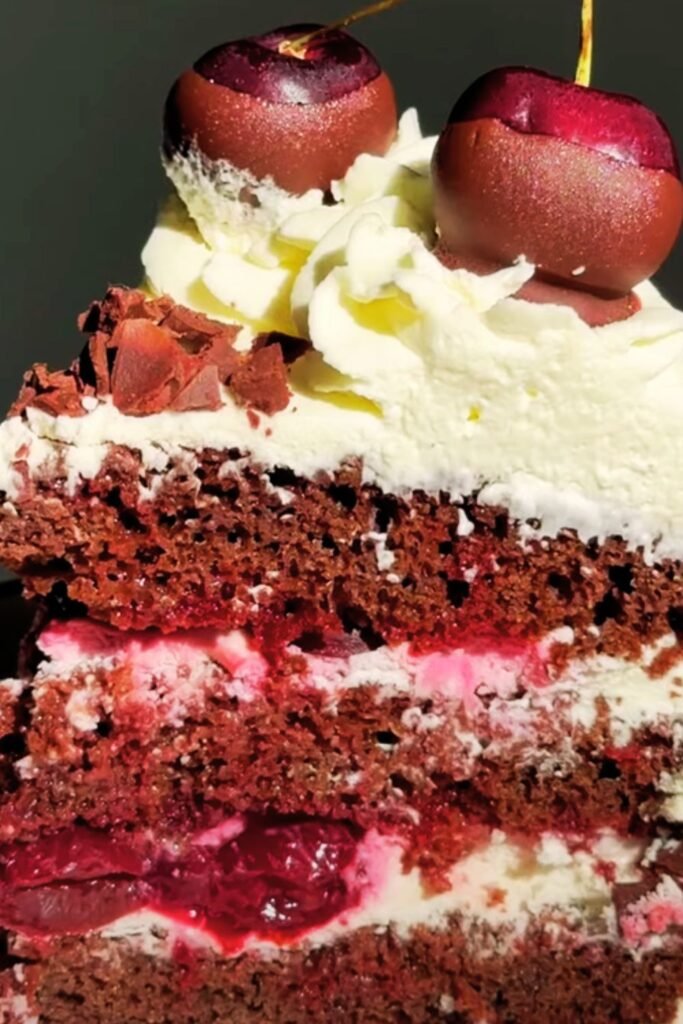
I place my first sponge layer on a serving plate and brush generously with cherry syrup. Then I spread one-third of the whipped cream evenly, leaving a small border around the edges.
The cherries go on next – I distribute them evenly but reserve the most attractive ones for the top decoration. I press them gently into the cream to prevent sliding.
This process repeats for the second layer, and then the third layer gets only the syrup treatment before the final cream coating.
Finishing Touches
I reserve about one-third of the cream for the exterior coating. Using a palette knife, I spread it smoothly around the sides and top, creating gentle swirls for visual appeal.
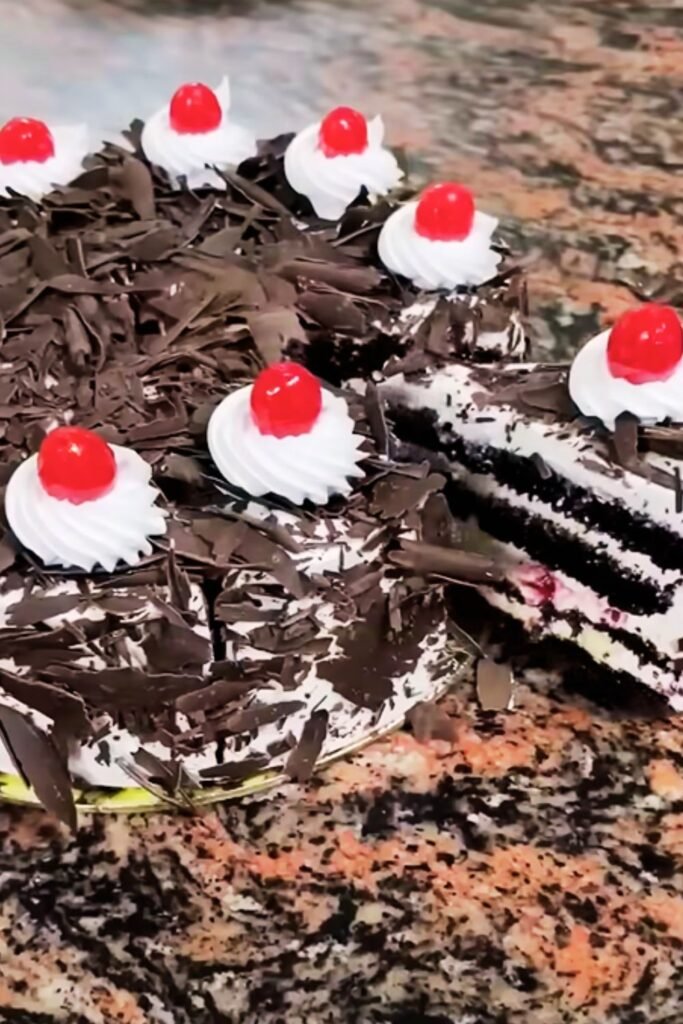
The final decoration involves chocolate shavings around the base and sides, with the reserved cherries arranged artistically on top. I use a vegetable peeler to create chocolate curls from a bar of dark chocolate.
Detailed Nutritional and Preparation Information
| Component | Preparation Time | Difficulty Level | Serves | Storage Life |
|---|---|---|---|---|
| Chocolate Sponge | 45 minutes | Medium | 12 portions | 3 days refrigerated |
| Cherry Preparation | 15 minutes | Easy | – | 1 week refrigerated |
| Whipped Cream | 10 minutes | Easy | – | 24 hours |
| Full Assembly | 30 minutes | Medium-Hard | 12 portions | 3 days refrigerated |
Ingredient Substitutions and Variations
| Original Ingredient | Substitute Option | Notes | Flavor Impact |
|---|---|---|---|
| Kirschwasser | Cherry juice + vodka | Mix 2:1 ratio | Slightly less intense |
| Morello cherries | Sweet cherries + lemon | Add 1 tbsp lemon juice | Less tart, still authentic |
| Heavy cream | Mascarpone blend | Mix with 100ml milk | Richer, denser texture |
| Cocoa powder | Melted chocolate | Reduce flour by 50g | More intense chocolate |
Common Mistakes and Solutions
Sponge Issues
Problem: Dense, heavy sponge Solution: I’ve learned that over-mixing deflates the eggs. Fold ingredients gently and stop as soon as they’re combined.
Problem: Sponge sticking to tin Solution: I line my tins with parchment paper and lightly dust with cocoa powder instead of flour.
Cream Problems
Problem: Cream separating or weeping Solution: Ensure cream is cold and don’t over-whip. Stop at soft peaks.
Problem: Cream not holding shape Solution: The cream might be too warm or the fat content too low. Use cream with at least 35% fat.
Assembly Challenges
Problem: Layers sliding apart Solution: I chill each layer for 15 minutes before adding the next. This firms up the cream.
Problem: Syrup making sponge soggy Solution: Apply syrup gradually and let it absorb before adding cream.
Serving Suggestions and Presentation
Traditional Serving Style
I serve Black Forest Gateau chilled, cutting it with a sharp knife dipped in warm water between slices. This prevents the cream from dragging and ensures clean cuts.
Each slice should showcase all the layers – the dark chocolate sponge, white cream, and red cherries create a stunning visual contrast.
Modern Presentation Ideas
For special occasions, I sometimes serve individual portions in glass dishes, creating deconstructed versions that highlight each component. Mini Black Forest Gateaux made in ramekins are perfect for dinner parties.
Accompaniment Suggestions
I recommend serving with:
- Fresh berries for added color and nutrition
- A small portion of vanilla ice cream
- Hot chocolate or coffee to complement the flavors
- Sparkling fruit juices for a festive touch
Storage and Make-Ahead Tips
Optimal Storage Conditions
I store my completed Black Forest Gateau in the refrigerator, covered with a cake dome or loose foil. The flavors actually improve after 24 hours as they meld together.
Component Preparation Schedule
Three Days Before: Bake and wrap sponge layers One Day Before: Prepare cherries and syrup Day Of: Whip cream and assemble
This schedule prevents last-minute stress and ensures optimal flavor development.
Troubleshooting Guide
Texture Problems
| Issue | Cause | Prevention | Fix |
|---|---|---|---|
| Dry sponge | Overbaking | Check at 25 minutes | Brush with extra syrup |
| Soggy bottom | Too much syrup | Apply gradually | Chill longer before serving |
| Grainy cream | Over-whipping | Stop at soft peaks | Start over with fresh cream |
| Sliding layers | Warm cream | Chill components | Refrigerate 30 minutes |
Professional Tips for Perfect Results
Temperature Control
I maintain consistent temperatures throughout the process. Room temperature ingredients mix better, but cream and assembled cake need to stay cold.
Timing Considerations
The entire process takes about 4 hours from start to finish, but most of that is passive time. I plan my day around the chilling periods.
Equipment Essentials
My essential tools include:
- Three identical cake tins
- Electric mixer with whisk attachment
- Large metal spoon for folding
- Palette knife for smooth finishing
- Sharp knife for clean slicing
Questions and Answers
Q: Can I make Black Forest Gateau without alcohol? I absolutely understand the need for alcohol-free versions. Replace the Kirschwasser with concentrated cherry juice or cherry extract mixed with a little water. The flavor won’t be quite as complex, but it’s still delicious.
Q: How far in advance can I make this cake? I’ve found that Black Forest Gateau actually tastes better after sitting for 24 hours. You can make it up to 3 days ahead, though the texture is best within the first 48 hours.
Q: Why did my sponge turn out dense and heavy? This usually happens from over-mixing the batter after adding the flour. I always fold gently and stop as soon as the ingredients are just combined. Also, ensure your eggs are at room temperature for better volume.
Q: Can I use frozen cherries instead of jarred ones? Frozen cherries work well, but thaw them completely and drain thoroughly. You might need to add a bit more sugar since frozen cherries can be more tart than jarred ones.
Q: My cream keeps separating – what am I doing wrong? Over-whipping is the most common cause. Stop at soft peaks, and make sure your cream, bowl, and beaters are all cold. If it’s a warm day, I sometimes whip over a bowl of ice water.
Q: How do I get clean slices when cutting? I dip my knife in warm water and wipe it clean between each cut. A sharp knife is essential, and cutting in a single downward motion works better than sawing back and forth.
Q: Can I make mini versions of this cake? Individual Black Forest Gateaux are wonderful for parties. I use 4-inch cake rings or large muffin tins, adjusting the baking time to about 15-20 minutes.
Q: What’s the best way to make chocolate shavings? I use a vegetable peeler on a bar of room-temperature dark chocolate. If the chocolate is too cold, it will just create dust; too warm, and it becomes difficult to handle.
Q: Can I substitute the heavy cream with something lighter? Heavy cream is really essential for the proper texture and stability. Lower-fat alternatives don’t whip properly and tend to separate. If you’re concerned about richness, serve smaller portions instead.
Q: How do I know when my sponge is properly baked? The sponge should spring back when lightly touched and start pulling away from the sides of the tin. A skewer inserted in the center should come out clean or with just a few moist crumbs.
My journey with Black Forest Gateau has taught me that patience and attention to detail make all the difference. Each component needs its moment to shine, and when they come together, the result is nothing short of magical. I hope this recipe brings you as much joy as it has brought me over the years.