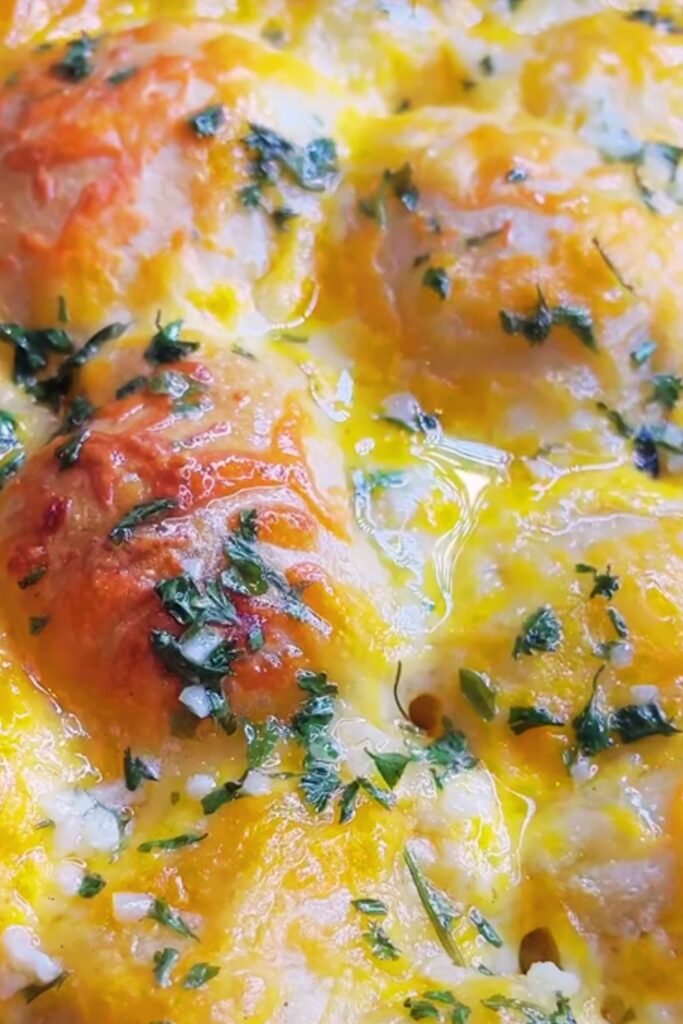
When I first encountered the magic of Big Blue Monster Stuffed Cookies, I knew I had stumbled upon something extraordinary. These aren’t your ordinary cookies – they’re vibrant, playful, and packed with surprises that’ll make both kids and adults squeal with delight. Picture this: soft, chewy blue cookies bursting with chocolate chips, marshmallows, and cookie crumbles, all wrapped around a gooey center that oozes pure happiness with every bite.
I’ve been perfecting this recipe for months, and let me tell you, it’s been quite the journey. The inspiration came from my daughter’s obsession with Cookie Monster, but the execution required serious baking science. These cookies combine the nostalgic appeal of childhood favorites with sophisticated flavor profiles that’ll impress even the most discerning palates.
Understanding the Big Blue Monster Phenomenon
Monster Cookies : Oversized cookies typically loaded with multiple mix-ins like chocolate chips, candies, nuts, and other confections, creating a “monstrous” appearance and flavor profile.
Stuffed Cookies : Cookies with a filling or center that creates a surprise element when bitten into, often featuring gooey centers like chocolate, caramel, or cream cheese.
Blue Food Coloring Technique : The art of achieving vibrant blue coloration in baked goods without compromising texture or flavor, requiring specific gel-based colorings for optimal results.
Cookie Crumb Integration : The method of incorporating actual cookie pieces into cookie dough to create textural contrast and enhance the “monster” aesthetic.
The beauty of these cookies lies in their complexity. They’re not just blue cookies with stuff thrown in – they’re carefully engineered treats that balance sweetness, texture, and visual appeal. Each component serves a purpose, from the tender crumb structure to the strategic placement of mix-ins that prevent overcrowding while maximizing flavor impact.
Essential Ingredients and Their Roles
Creating the perfect Big Blue Monster Stuffed Cookie requires understanding how each ingredient contributes to the final masterpiece. I’ve experimented with countless variations, and this combination delivers consistently spectacular results.
| Ingredient | Quantity | Purpose | Substitution Options |
|---|---|---|---|
| All-purpose flour | 2¼ cups | Structure and texture | Bread flour (reduce by 2 tbsp) |
| Butter (unsalted) | 1 cup | Richness and moisture | Coconut oil (¾ cup) |
| Brown sugar | ¾ cup | Moisture and chewiness | Coconut sugar (same amount) |
| Granulated sugar | ½ cup | Sweetness and spread | Caster sugar (same amount) |
| Eggs | 2 large | Binding and leavening | Flax eggs (2 tbsp + 6 tbsp water) |
| Vanilla extract | 2 tsp | Flavor enhancement | Almond extract (1 tsp) |
| Blue gel food coloring | 1-2 tsp | Vibrant color | Natural butterfly pea powder |
| Baking soda | 1 tsp | Leavening agent | Baking powder (2 tsp) |
| Salt | ½ tsp | Flavor balance | Sea salt (same amount) |
| Mini chocolate chips | 1½ cups | Texture and sweetness | White chocolate chips |
| Mini marshmallows | 1 cup | Gooey texture | Marshmallow fluff (½ cup) |
| Crushed cookies | ¾ cup | Monster aesthetic | Graham cracker crumbs |
| Cream cheese | 8 oz | Stuffing center | Nutella (½ cup) |
| Powdered sugar | ½ cup | Stuffing sweetness | Maple syrup (¼ cup) |
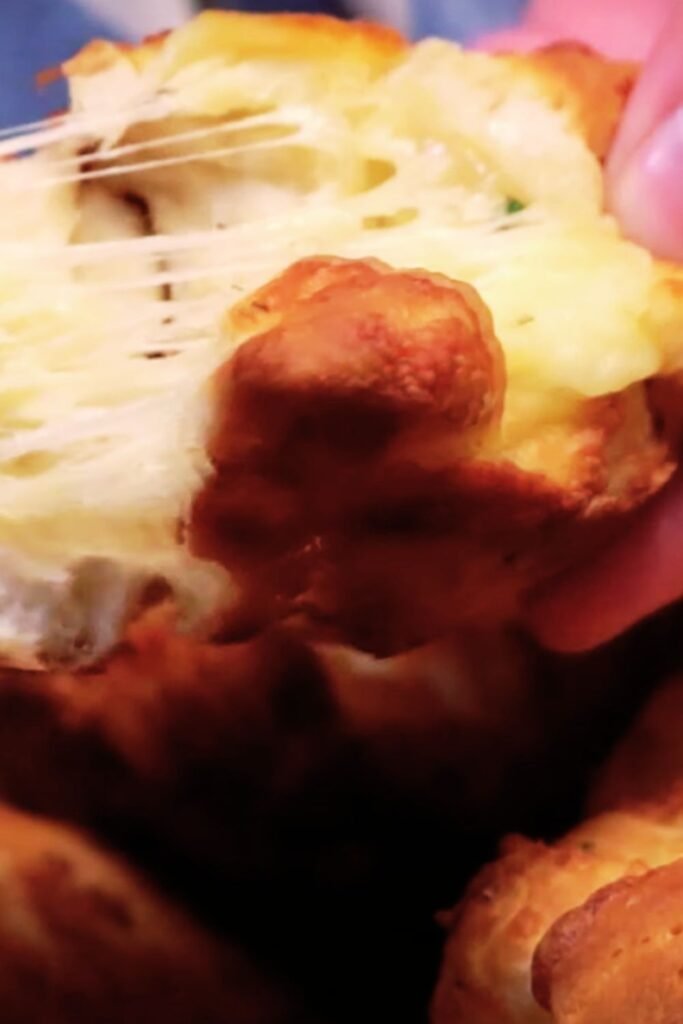
The magic happens when these ingredients work together. The combination of brown and white sugars creates the perfect chewy-crispy balance, while the cream cheese filling provides that luxurious surprise center that makes these cookies truly special.

Step-by-Step Creation Process
Preparing the Stuffing Center
I always start with the filling because it needs time to chill and firm up. This step is crucial – a runny center will turn your beautiful cookies into a melted mess.
- Soften cream cheese to room temperature (about 30 minutes out of the fridge)
- Beat cream cheese until completely smooth and fluffy
- Gradually add powdered sugar, beating until no lumps remain
- Add a pinch of vanilla extract for extra flavor
- Scoop mixture into tablespoon-sized portions on a lined baking sheet
- Freeze for at least 30 minutes until firm
Creating the Cookie Dough Base
The dough is where the real magic begins. I’ve learned that the order of operations matters tremendously for achieving that perfect monster texture.
- Cream butter with both sugars until light and fluffy (about 3-4 minutes)
- Add eggs one at a time, beating well after each addition
- Mix in vanilla extract and blue food coloring until evenly distributed
- In a separate bowl, whisk together flour, baking soda, and salt
- Gradually add dry ingredients to wet ingredients, mixing just until combined
- Fold in chocolate chips, marshmallows, and cookie crumbs gently
Assembly and Shaping Technique
This is where patience pays off. Each cookie needs individual attention to ensure the filling stays centered and the dough wraps properly.
- Scoop about 2 tablespoons of dough and flatten in your palm
- Place a frozen cream cheese ball in the center
- Top with another tablespoon of dough
- Carefully seal edges, ensuring no filling shows through
- Roll gently between palms to create a uniform ball
- Place on lined baking sheets with plenty of space between cookies
Baking for Perfection
Temperature control is everything when baking stuffed cookies. Too hot, and the filling will leak out; too cool, and you won’t get proper spread and texture.
| Baking Parameter | Specification | Why It Matters |
|---|---|---|
| Oven Temperature | 350°F (175°C) | Optimal for even cooking |
| Baking Time | 11-13 minutes | Prevents overcooking |
| Pan Position | Center rack | Even heat distribution |
| Cookie Spacing | 3 inches apart | Allows for spreading |
| Cooling Time | 5 minutes on pan | Prevents breaking |
| Final Cooling | Wire rack | Prevents soggy bottoms |
Troubleshooting Common Issues
After making hundreds of these cookies, I’ve encountered every possible problem. Here’s how to avoid the most common pitfalls:
Filling Leakage Prevention : Ensure your cream cheese mixture is properly chilled and firm before assembly. If it’s too soft, it’ll melt and leak during baking.
Color Consistency : Use gel food coloring rather than liquid. Liquid coloring can alter the dough’s moisture content and affect texture.
Uneven Baking : Rotate your baking sheets halfway through baking time. Every oven has hot spots that can cause uneven browning.
Flat Cookies : This usually indicates overmixing the dough or butter that was too warm. Keep ingredients at proper temperatures and mix just until combined.
The key to success lies in preparation and patience. I always make the filling a day ahead, which gives me more time to focus on the dough and assembly process.
Flavor Variations and Customizations
One of the things I love most about this recipe is its adaptability. Once you master the basic technique, you can create endless variations:
Seasonal Adaptations
Halloween Orange Monsters : Replace blue coloring with orange, add candy corn pieces, and use pumpkin spice cream cheese filling.
Christmas Green Monsters : Use green coloring, add crushed peppermint candies, and fill with mint cream cheese.
Valentine’s Pink Monsters : Pink coloring with strawberry extract, white chocolate chips, and strawberry cream cheese filling.
Dietary Modifications
Gluten-Free Version : Substitute all-purpose flour with a 1:1 gluten-free baking blend. Add 1 teaspoon xanthan gum if your blend doesn’t contain it.
Vegan Adaptation : Replace butter with vegan butter, eggs with flax eggs, and use vegan cream cheese for the filling.
Reduced Sugar Option : Cut both sugars by half and add 2 tablespoons of unsweetened applesauce for moisture.
Storage and Serving Suggestions
Proper storage ensures your Big Blue Monster Cookies maintain their delightful texture and flavor for days. I’ve tested various methods to find what works best:
Short-Term Storage (1-3 days)
Store cooled cookies in an airtight container at room temperature. Place parchment paper between layers to prevent sticking. The cream cheese filling remains stable at room temperature for this duration.
Long-Term Storage (Up to 2 weeks)
For longer storage, I recommend refrigerating the cookies in airtight containers. Bring them to room temperature before serving for the best texture. The filling actually improves with a day or two of mellowing.
Freezing Instructions
These cookies freeze beautifully for up to 3 months. Wrap individual cookies in plastic wrap, then place in freezer bags. Thaw at room temperature for about 30 minutes before serving.
Nutritional Information and Considerations
| Nutrient | Per Cookie | Daily Value % |
|---|---|---|
| Calories | 285 | 14% |
| Total Fat | 12g | 18% |
| Saturated Fat | 7g | 35% |
| Cholesterol | 45mg | 15% |
| Sodium | 180mg | 8% |
| Total Carbs | 42g | 14% |
| Dietary Fiber | 1g | 4% |
| Sugars | 28g | – |
| Protein | 4g | 8% |
While these cookies are definitely an indulgent treat, they do provide some nutritional value through the eggs, flour, and dairy components. I always recommend enjoying them as part of a balanced diet.
Perfect Pairings and Serving Ideas
The beauty of Big Blue Monster Stuffed Cookies lies in their versatility. Here are my favorite ways to serve them:
Beverage Pairings
Cold Milk : The classic pairing that never fails. The coolness balances the sweetness perfectly.
Hot Chocolate : Especially delicious during colder months. The chocolate complements the cookie’s complexity.
Coffee or Espresso : The bitter notes create a beautiful contrast with the sweet, gooey center.
Fruit Smoothies : A healthier option that adds vitamins while maintaining the fun factor.
Special Occasion Presentations
Birthday Parties : Arrange on colorful platters with coordinating decorations. Kids absolutely love the surprise centers.
Bake Sales : These always sell out first. Package individually in clear bags to showcase the blue color.
Holiday Gatherings : Create themed versions using seasonal colors and flavors.
Advanced Techniques for Cookie Perfection
After mastering the basic recipe, I’ve developed several advanced techniques that elevate these cookies to professional bakery quality:
Temperature Control Mastery
Ingredient Temperature Harmony : All ingredients should be at room temperature except the cream cheese filling, which should be frozen solid.
Dough Temperature Monitoring : If your dough becomes too warm during assembly, chill it for 15 minutes before continuing.
Baking Stone Advantage : Using a pizza stone or baking steel creates more even heat distribution and better texture.
Professional Finishing Touches
Egg Wash Glaze : Brush cookies lightly with beaten egg before baking for extra shine and color depth.
Sea Salt Finishing : A tiny pinch of flaky sea salt on top before baking adds gourmet appeal.
Drizzle Decorations : After cooling, drizzle with melted white chocolate for an elegant finish.
Questions and Answers
Q: Why do my cookies spread too much during baking?
This usually happens when the dough is too warm or the butter was overmixed. Make sure your butter is at room temperature but not melted, and avoid overmixing once you add the flour. If the dough feels too soft, chill it for 30 minutes before baking.
Q: Can I make these cookies without the blue coloring?
Absolutely! The cookies taste just as delicious without the coloring. You can leave them natural or experiment with other colors. Just remember that gel food coloring works better than liquid for maintaining proper dough consistency.
Q: How do I prevent the filling from leaking out?
The key is making sure your cream cheese mixture is properly chilled and firm before assembly. I freeze mine for at least 30 minutes. Also, make sure to seal the edges of the dough completely around the filling, with no visible gaps.
Q: Can I use regular chocolate chips instead of mini chips?
You can, but mini chips distribute more evenly throughout the dough and are less likely to create air pockets that could cause the filling to leak. If you only have regular chips, roughly chop them into smaller pieces.
Q: Why are my cookies too cake-like instead of chewy?
This usually indicates too much flour or overmixing. Measure your flour carefully (I recommend weighing it if you have a scale), and mix the dough just until the ingredients are combined. Overmixing develops the gluten, creating a tougher, more cake-like texture.
Q: How long should I let the cookies cool before serving?
Let them cool on the baking sheet for about 5 minutes, then transfer to a wire rack. For the best texture and to prevent the filling from being too runny, wait at least 10 minutes before serving. The filling will still be wonderfully gooey but won’t burn your tongue.
Q: Can I make the dough ahead of time?
Yes! You can prepare the dough and even assemble the cookies up to 24 hours ahead. Store the assembled cookies in the refrigerator, covered with plastic wrap. They might need an extra minute or two of baking time if they’re cold from the fridge.
Q: What’s the best way to achieve consistent cookie sizes?
I use a cookie scoop or ice cream scoop to ensure uniform portions. For these cookies, I use about 2 tablespoons of dough for the bottom, add the filling, then another tablespoon for the top. Consistency in size ensures even baking.
Q: Can I double the recipe?
Absolutely! This recipe doubles beautifully. Just make sure your mixing bowl is large enough to handle the increased volume, and you might need to bake in multiple batches. The timing and temperature remain the same.
Q: What should I do if my cookies are browning too quickly?
If the tops are browning too fast but the cookies aren’t done, lower your oven temperature by 25°F and continue baking. Every oven is different, so you might need to adjust the temperature for your specific oven. You can also tent them with foil if necessary.
These Big Blue Monster Stuffed Cookies have become my signature treat, and I hope they bring as much joy to your kitchen as they have to mine. The combination of playful appearance, complex flavors, and surprise centers makes them perfect for any occasion where you want to create something truly special. Remember, baking is as much about the love you put into it as the technique, so have fun with the process and don’t be afraid to make these cookies your own!