Nothing quite compares to the satisfaction of biting into a perfectly flaky, buttery croissant broodje. I’ve been perfecting my technique for years, and I’m excited to share everything I’ve learned about creating these delectable Dutch-inspired sandwich rolls that have become a staple in my kitchen.
When I first discovered croissant broodjes, I was immediately captivated by their versatility. These aren’t just ordinary sandwiches – they’re a beautiful marriage of French pastry technique and Dutch practicality. The result is a bread that’s sophisticated enough for special occasions yet approachable enough for everyday meals.
What Makes Croissant Broodjes Special
Croissant Broodjes: Dutch-style sandwich rolls made using laminated dough technique, creating multiple flaky layers similar to traditional croissants but shaped into individual bread rolls perfect for filling.
Laminated Dough: A pastry technique where butter is folded into dough multiple times, creating distinct layers that separate during baking to produce the characteristic flaky texture.
Proofing: The final rise of shaped dough before baking, crucial for achieving the proper texture and volume in croissant broodjes.
The magic of croissant broodjes lies in their construction. Unlike regular bread rolls, these use a laminated dough process that creates hundreds of delicate layers. Each fold incorporates more butter, and when the dough hits the oven’s heat, steam forms between these layers, creating the signature flaky texture I’ve come to love.
Essential Ingredients and Their Roles
| Ingredient | Quantity | Purpose | Quality Tips |
|---|---|---|---|
| Strong white flour | 500g | Provides structure and gluten development | Use bread flour with 12-14% protein content |
| Unsalted butter (dough) | 60g | Adds richness and tender crumb | Room temperature, European-style preferred |
| Unsalted butter (lamination) | 250g | Creates flaky layers | Cold, high-fat content (82% minimum) |
| Whole milk | 250ml | Hydration and flavor | Full-fat for best results |
| Fresh yeast | 12g | Leavening agent | Can substitute with 6g active dry yeast |
| Sugar | 25g | Feeds yeast and adds subtle sweetness | Caster sugar dissolves easily |
| Salt | 8g | Flavor enhancement and gluten strengthening | Fine sea salt recommended |
| Egg (for wash) | 1 large | Golden color and shine | Room temperature for even application |

My experience has taught me that ingredient quality makes an enormous difference. I always invest in European-style butter with higher fat content – it creates superior layers and richer flavor. The flour choice is equally crucial; I use strong white bread flour because the higher protein content develops the gluten network needed to support all those buttery layers.
The Step-by-Step Process
Making the Base Dough
I start by warming the milk slightly – just until it’s lukewarm, never hot. Hot milk will kill the yeast, and I’ve learned this lesson the hard way. I crumble the fresh yeast into the warm milk with a pinch of sugar, whisking until completely dissolved.
In my large mixing bowl, I combine the flour, remaining sugar, and salt. I make a well in the center and pour in the yeast mixture along with the softened butter. Using my hands, I bring everything together into a rough dough.
The kneading process takes patience. I work the dough for about eight minutes until it becomes smooth and elastic. The dough should be slightly sticky but manageable. I’ve found that a light dusting of flour on my work surface helps prevent sticking without making the dough too dry.
Preparing the Butter Block
While the dough rests, I prepare my butter block. This step is critical for successful lamination. I place the cold butter between two sheets of parchment paper and pound it with a rolling pin until it’s pliable but still cold. The goal is to achieve the same consistency as the dough – if the butter is too hard, it will break through the dough; too soft, and it will squeeze out during rolling.
The Lamination Process
| Fold Number | Technique | Rest Time | Temperature Check |
|---|---|---|---|
| First fold | Letter fold (3 layers) | 30 minutes chilled | Butter should be pliable |
| Second fold | Letter fold (9 layers) | 30 minutes chilled | Dough shouldn’t tear |
| Third fold | Letter fold (27 layers) | 45 minutes chilled | Final rest before shaping |

After the dough has rested for about an hour in the refrigerator, I roll it into a rectangle roughly twice the size of my butter block. I place the butter in the center and fold the dough over it like an envelope, sealing the edges carefully.
The first roll-out requires gentle, even pressure. I start from the center and work outward, being careful not to let the butter break through the dough. Once I have a long rectangle, I perform the first letter fold: fold one third over the middle, then the remaining third over that.
Each fold multiplies the number of layers exponentially. After three folds, I have 27 distinct layers of dough and butter. Between each fold, I chill the dough for at least 30 minutes. This rest period is non-negotiable – it relaxes the gluten and keeps the butter at the right temperature.
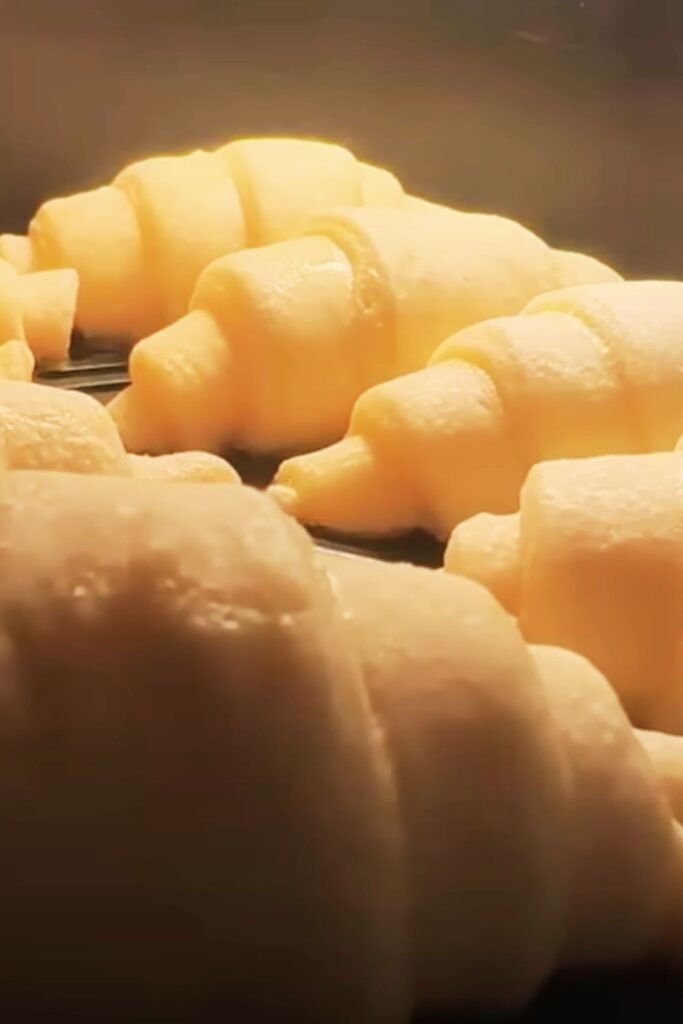
Shaping the Broodjes
Once my lamination is complete, I roll the dough into a rectangle about 1cm thick. Using a sharp knife, I cut the dough into rectangles approximately 10cm by 8cm. The key to beautiful croissant broodjes is clean, decisive cuts that don’t drag or compress the layers.
I place each piece on parchment-lined baking trays, leaving adequate space between them for expansion. The final proof is crucial – I leave them in a warm, draft-free environment until they’ve nearly doubled in size. This usually takes 1.5 to 2 hours, depending on the temperature.
Baking Perfection
| Temperature Phase | Duration | Purpose | Visual Cues |
|---|---|---|---|
| 220°C initial | 5 minutes | Steam creation and layer separation | Rapid rise begins |
| 190°C reduced | 12-15 minutes | Even browning and cooking through | Golden brown color |
| Final 180°C | 2-3 minutes | Perfect finish | Deep golden, hollow sound when tapped |
Before baking, I brush each broodje with beaten egg wash, taking care not to let it drip down the sides where it might seal the layers. I preheat my oven to 220°C and place a small dish of water on the bottom rack to create steam.
The initial high heat is essential for creating steam within the layers, causing them to separate dramatically. After five minutes, I reduce the temperature to 190°C and continue baking until they’re deep golden brown. The finished broodjes should sound hollow when tapped on the bottom.
Serving Suggestions and Variations
My favorite way to serve croissant broodjes is still warm from the oven, split horizontally and filled with premium ingredients. Here are some combinations I’ve perfected over the years:
Savory Options
- Smoked salmon with cream cheese, capers, and fresh dill
- Aged Dutch cheese with thinly sliced apple and whole grain mustard
- Ham and aged Gouda with butter lettuce and tomato
- Roast beef with horseradish cream and watercress
- Grilled vegetables with herbed goat cheese
Sweet Variations
- Fresh strawberries with whipped cream and a drizzle of honey
- Banana slices with almond butter and cinnamon
- Apple compote with mascarpone and chopped walnuts
- Dark chocolate spread with fresh raspberries
Storage and Reheating Tips
| Storage Method | Duration | Quality Retention | Reheating Instructions |
|---|---|---|---|
| Room temperature | 1-2 days | Best for immediate use | 5 minutes at 160°C |
| Refrigerated | 3-4 days | Slight texture change | 8 minutes at 160°C, covered |
| Frozen (whole) | 1 month | Excellent when properly wrapped | Thaw overnight, then reheat |
| Frozen (pre-baked) | 2 months | Professional bakery technique | Bake from frozen at 180°C |
Fresh croissant broodjes are undoubtedly best enjoyed within a day of baking, but I’ve developed techniques for preserving them longer. If I’m not serving them immediately, I let them cool completely before storing in airtight containers. For longer storage, I wrap them individually in plastic wrap and freeze them.
When reheating, I never use a microwave – it destroys the delicate flaky texture I’ve worked so hard to achieve. Instead, I warm them in a moderate oven for just a few minutes until they’re heated through and the exterior becomes crisp again.
Troubleshooting Common Issues
Through years of making croissant broodjes, I’ve encountered and solved numerous problems:
Butter leaking during baking: This usually means the butter was too soft during lamination or the dough wasn’t chilled adequately between folds. I always check that my butter has the same consistency as the dough before beginning.
Dense, heavy texture: Insufficient proofing is often the culprit. I’ve learned to be patient during the final rise – the broodjes should feel light and puffy before baking.
Uneven layers: This occurs when the dough isn’t rolled evenly or when the butter block isn’t uniform in thickness. I take extra care to maintain consistent pressure while rolling.
Poor rise in the oven: Usually indicates old yeast or inadequate initial fermentation. I always test my yeast in warm milk before proceeding with the recipe.
Nutritional Considerations
While croissant broodjes are undoubtedly an indulgent treat, I believe in enjoying them mindfully as part of a balanced diet. Each broodje contains approximately 280-320 calories, depending on size, with a significant portion coming from the butter used in lamination.
The high butter content provides fat-soluble vitamins A, D, E, and K, while the flour contributes B vitamins and some protein. When filled with nutrient-dense ingredients like vegetables, lean proteins, or fruits, croissant broodjes can be part of a nutritious meal.
Cultural Significance and History
The croissant broodje represents a beautiful fusion of culinary traditions. While the lamination technique originated in French patisserie, Dutch bakers adapted it to create these versatile sandwich rolls that fit perfectly into their café culture.
In the Netherlands, broodjes are more than just sandwiches – they’re a social institution. Whether enjoyed as a quick breakfast, leisurely lunch, or afternoon snack, they bring people together around tables in cozy cafés throughout the country.
Professional Tips from My Kitchen
After making thousands of croissant broodjes, I’ve developed several techniques that consistently deliver superior results:
I always weigh my ingredients rather than using volume measurements. Baking is a science, and precision matters, especially with laminated doughs where the ratios of flour, butter, and liquid are critical.
Temperature control is everything. I use an instant-read thermometer to check my milk temperature, and I never skip the chilling periods between folds. My kitchen thermometer helps me maintain the ideal proofing environment.
Timing is crucial but flexible. While I provide specific timeframes, I’ve learned to read the dough’s cues. Proper fermentation and proofing are more important than strict adherence to the clock.
Quality ingredients make a noticeable difference. I source the best butter I can find, use filtered water for my dough, and choose flour from reputable mills. These investments pay dividends in flavor and texture.
Seasonal Adaptations
I adjust my technique based on the season and kitchen temperature. During summer, I work more quickly and chill the dough more frequently to prevent the butter from becoming too soft. In winter, I might need to extend proofing times or create a warmer environment for the yeast to work effectively.
Spring brings opportunities to incorporate fresh herbs into the dough or create seasonal fillings with early vegetables. Autumn invites warm spices and apple-based preparations that complement the buttery richness beautifully.
Advanced Techniques
Once you’ve mastered the basic croissant broodje, there are several advanced techniques worth exploring. I sometimes incorporate a small percentage of whole wheat flour for added complexity, or experiment with different fats like cultured butter for enhanced flavor.
Pre-fermentation techniques, such as creating a poolish or biga, can add depth to the flavor profile. These require advance planning but result in more complex, nuanced bread with improved keeping qualities.
For special occasions, I create flavored variations by incorporating ingredients directly into the dough. Herbs, spices, or even small amounts of cheese can be worked into the base dough for unique variations.
Building Your Confidence
My advice to anyone attempting croissant broodjes for the first time is to embrace the process rather than focusing solely on the outcome. Each batch teaches valuable lessons about dough behavior, timing, and technique.
Start with small batches until you develop confidence with the lamination process. Keep detailed notes about timing, temperatures, and results – this information becomes invaluable for refining your technique.
Don’t be discouraged if your first attempts aren’t perfect. Even professional bakers had to learn through practice and patience. The satisfaction of pulling a tray of golden, flaky croissant broodjes from your own oven makes every moment of effort worthwhile.
Questions and Answers
Q: Can I make croissant broodjes without a stand mixer? Absolutely! I actually prefer making the dough by hand because it gives me better control over the texture and allows me to feel when the gluten has developed properly. The kneading takes a bit longer, but the results are just as good.
Q: How far in advance can I prepare the dough? You can prepare the laminated dough up to two days ahead and keep it refrigerated. In fact, the extended cold fermentation often improves the flavor. Just make sure to wrap it tightly to prevent the surface from drying out.
Q: What’s the best way to cut the dough without deflating it? I use a very sharp knife or a bench scraper and make swift, decisive cuts straight down without sawing motions. Dragging the blade through the dough can seal the layers and prevent proper rising.
Q: Can I freeze the shaped broodjes before baking? Yes, this is actually a professional technique I use regularly. After shaping, place them on trays and freeze until solid, then transfer to freezer bags. They can be baked directly from frozen, just add a few extra minutes to the baking time.
Q: Why do my broodjes sometimes have uneven layers? Uneven layers usually result from inconsistent rolling pressure or butter that’s not at the right temperature. The butter should be pliable but not soft – about the same consistency as the dough.
Q: How do I know when the final proof is complete? The broodjes should nearly double in size and feel light and airy when gently pressed. They should spring back slowly when lightly touched. Under-proofed broodjes will be dense; over-proofed ones may collapse in the oven.
Q: Can I make smaller or larger versions? Definitely! I often make mini versions for appetizers or larger ones for hearty sandwiches. Just adjust the baking time accordingly – smaller ones will bake faster, larger ones need more time.
Q: What should I do if my butter breaks through the dough during lamination? If small tears appear, lightly dust with flour and continue carefully. For larger breaks, patch with a small piece of dough and chill the whole thing for 30 minutes before proceeding.
Q: How can I tell if my yeast is still active? I always proof my yeast first by dissolving it in warm milk with a pinch of sugar. After 5-10 minutes, it should be foamy and fragrant. If there’s no activity, the yeast is dead and needs to be replaced.
Q: What’s the ideal kitchen temperature for making croissant broodjes? I find that 20-22°C (68-72°F) works best. Warmer temperatures make the butter too soft for proper lamination, while cooler temperatures slow down yeast activity and make the dough harder to work with.