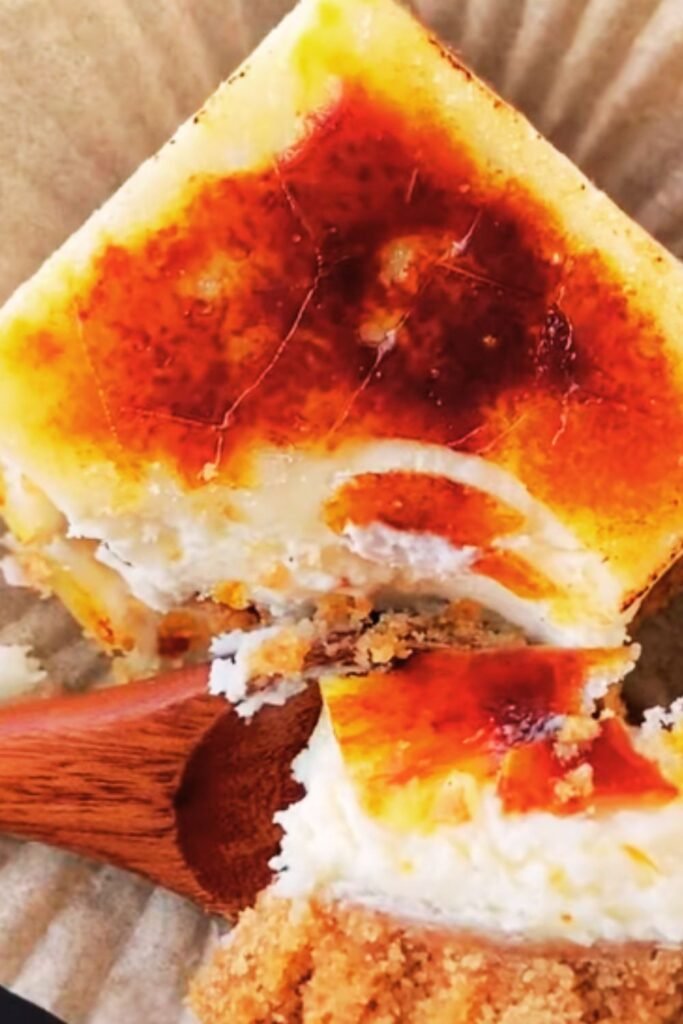
Have you ever found yourself torn between two desserts? I certainly have! That moment when you can’t decide between the silky smoothness of a classic cheesecake or the crackling caramelized top of a crème brûlée. Well, I’m thrilled to share that you don’t have to choose anymore. These Crème Brûlée Cheesecake Bars bring together the best of both worlds in one perfectly portioned treat.
As someone who’s been baking for over fifteen years, I can confidently say these bars are a showstopper. The buttery graham cracker crust, velvety vanilla bean cheesecake filling, and that signature caramelized sugar top create a dessert that’s both elegant and approachable. Whether you’re serving these at a dinner party or simply treating yourself after a long week, they’re guaranteed to impress.
The Magic of Two Desserts in One
The genius of these bars lies in their perfect marriage of textures and flavors. The dense, creamy cheesecake layer provides a luxurious base, while the crackly torched sugar creates that distinctive “tap and shatter” experience we all love about crème brûlée.
I’ve made these countless times for gatherings, and they’re always the first dessert to disappear. There’s something about the individual portions that makes them both visually appealing and practical to serve. Plus, you can prepare them ahead of time and add the caramelized sugar just before serving – perfect for entertaining!
What You’ll Need
For the Graham Cracker Crust:
- 2 cups graham cracker crumbs (about 16 full sheets)
- 1/4 cup granulated sugar
- 1/2 cup (1 stick) unsalted butter, melted
- 1/4 teaspoon salt
For the Cheesecake Filling:
- 24 oz (3 packages) cream cheese, softened to room temperature
- 1 cup granulated sugar
- 3 large eggs, room temperature
- 2 teaspoons pure vanilla extract
- Seeds from 1 vanilla bean (or 1 additional teaspoon vanilla extract)
- 1/4 cup heavy cream
- 2 tablespoons all-purpose flour
For the Crème Brûlée Topping:
- 1/2 cup granulated sugar (for torching)
Special Equipment:
- 9×13 inch baking pan
- Parchment paper
- Kitchen torch (or broiler)
- Food processor (optional, for graham crackers)
- Stand mixer or hand mixer
- Offset spatula
Step-by-Step Instructions
Preparing the Crust
- Preheat your oven to 325°F (165°C). Line a 9×13 inch baking pan with parchment paper, leaving some overhang on the sides for easy removal later.
- In a medium bowl, combine the graham cracker crumbs, sugar, melted butter, and salt. Mix until the mixture resembles wet sand and holds together when pressed.
- Press the mixture firmly and evenly into the bottom of the prepared pan. I find using the bottom of a measuring cup helps create an even layer.
- Bake the crust for 10 minutes until it’s lightly golden and smells fragrant. Remove from the oven and let cool while preparing the filling. Keep the oven on.
Making the Cheesecake Filling
- In the bowl of a stand mixer fitted with the paddle attachment (or using a hand mixer), beat the softened cream cheese on medium speed until completely smooth, about 3 minutes. Scrape down the sides of the bowl several times during this process.
- Add the sugar and beat for another 2-3 minutes until well incorporated and the mixture is light and fluffy.
- Add the eggs one at a time, mixing well after each addition, but don’t overmix. Scrape down the sides and bottom of the bowl.
- Add the vanilla extract, vanilla bean seeds, heavy cream, and flour. Mix on low speed just until combined and smooth. Be careful not to incorporate too much air into the batter.
- Pour the filling over the cooled crust and spread it evenly with an offset spatula.
- Bake for 35-40 minutes, or until the edges are set but the center still has a slight jiggle when the pan is gently shaken.
- Turn off the oven, crack the door open, and let the cheesecake cool in the oven for about 30 minutes. This gradual cooling helps prevent cracks.
- Remove from the oven and cool completely at room temperature, then refrigerate for at least 4 hours or overnight.
Creating the Crème Brûlée Topping
- When ready to serve, lift the chilled cheesecake out of the pan using the parchment paper overhang and place it on a cutting board.
- Cut into bars of your desired size (I usually aim for 12-16 bars, depending on the occasion).
- Sprinkle each bar with an even layer of granulated sugar, about 1-2 teaspoons per bar.
- Using a kitchen torch, carefully caramelize the sugar until it melts and turns a deep amber color. Hold the torch about 2 inches from the surface and move it continuously to avoid burning.
- Let the caramelized sugar cool and harden for about 2 minutes before serving.
Chef’s Tip: If you don’t have a kitchen torch, you can use your oven’s broiler. Place the sugar-topped bars on a baking sheet and broil for 1-2 minutes, watching VERY carefully to avoid burning. The results won’t be quite as precise as with a torch, but still delicious!
Troubleshooting Guide
Making cheesecake can sometimes be tricky, but I’ve run into (and solved) most of the common issues over the years. Here’s my guide to perfect bars every time:
| Problem | Possible Cause | Solution |
|---|---|---|
| Cracked cheesecake | Overbaking or rapid temperature change | Bake just until center is slightly jiggly; cool gradually in turned-off oven with door cracked |
| Lumpy filling | Cream cheese not at room temperature | Ensure cream cheese is fully softened; beat longer before adding other ingredients |
| Soggy crust | Underbaking the crust | Pre-bake crust for full 10 minutes; cool slightly before adding filling |
| Sugar won’t caramelize properly | Uneven sugar application or moisture on surface | Ensure cheesecake is cold and dry; apply sugar in thin, even layer |
| Burnt caramel topping | Torch held too close or in one spot too long | Keep torch moving constantly; hold 2 inches from surface |
| Cheesecake too soft | Underbaking or not chilling long enough | Extend baking time if center is too jiggly; chill for full 4+ hours |
| Difficult to cut cleanly | Bars not cold enough | Chill thoroughly; clean knife between cuts; dip knife in hot water |
Make-Ahead and Storage Tips
One of the reasons I love these bars for entertaining is their make-ahead potential. Here’s how to maximize their freshness:
Make-Ahead Options:
- 1-2 days ahead: Prepare cheesecake completely (without sugar topping), cover tightly, and refrigerate.
- Up to 1 month ahead: Freeze the untopped cheesecake bars by wrapping individually in plastic wrap, then storing in an airtight container.
- Day of serving: Add the sugar topping and torch just before serving for the best texture contrast.
Storage Tips:
- Refrigerator: Store leftover brûléed bars in an airtight container for up to 3 days. Note that the caramelized sugar topping will soften over time.
- Freezer: Untopped bars can be frozen for up to 1 month. Thaw overnight in the refrigerator before adding the sugar topping.
Variation Ideas

While the classic vanilla version is divine, I’ve experimented with several variations that work beautifully:
Flavor Twists:
- Citrus Infused: Add 1 tablespoon of orange or lemon zest to the filling for a bright citrus note.
- Espresso: Dissolve 1 tablespoon of espresso powder in the heavy cream before adding to create a coffee-flavored cheesecake.
- Chocolate Bottom: Sprinkle 1 cup of mini chocolate chips over the pre-baked crust before adding the filling.
- Berry Swirl: Gently swirl 1/4 cup of strained raspberry or blackberry preserves through the filling before baking.
Crust Alternatives:
- Chocolate Cookie Crust: Substitute chocolate sandwich cookies (cream removed) for the graham crackers.
- Gingersnap Crust: Use gingersnap cookies instead of graham crackers for a spicy complement.
- Shortbread Crust: Crushed shortbread cookies make an extra buttery base.
- Nut Crust: Add 1/2 cup finely chopped toasted pecans or almonds to the graham cracker mixture.
Serving Suggestions
These elegant bars deserve an equally thoughtful presentation. Here are my favorite ways to serve them:
- Pair with a small dollop of lightly whipped cream and fresh berries for color and textural contrast.
- Serve alongside a rich espresso or cappuccino to balance the sweetness.
- For an extra special touch, add a light dusting of edible gold dust over the caramelized sugar layer.
- Create a dessert board with these bars as the centerpiece, surrounded by chocolate truffles, fresh fruit, and small cookies.
- For a refreshing complement, offer a small scoop of tart sorbet on the side.
Nutritional Information
While these are definitely a treat, it’s sometimes helpful to know what you’re enjoying. Here’s the approximate nutritional breakdown per bar (assuming 16 bars per recipe):
| Nutrient | Amount per Serving |
|---|---|
| Calories | 320 |
| Total Fat | 22g |
| Saturated Fat | 13g |
| Cholesterol | 105mg |
| Sodium | 230mg |
| Total Carbohydrates | 26g |
| Dietary Fiber | <1g |
| Sugars | 21g |
| Protein | 5g |
Why This Recipe Works
As someone who’s tested dozens of cheesecake recipes, I’ve incorporated several key techniques that ensure success:
- Room temperature ingredients: This prevents lumps and ensures a smooth, creamy filling.
- Pre-baking the crust: Creates a sturdy foundation that doesn’t get soggy.
- Low and slow baking: The moderate oven temperature prevents the cheesecake from puffing up too quickly and then collapsing.
- Gradual cooling: Letting the cheesecake cool slowly in the turned-off oven prevents the dramatic temperature change that can cause cracks.
- Thorough chilling: Allowing the bars to set completely makes them easier to cut and improves the flavor.
- Individual brûlée topping: Caramelizing the sugar right before serving creates that magical texture contrast.
Common Questions About Crème Brûlée Cheesecake Bars
Over the years, I’ve received many questions about this recipe. Here are the most common ones:
Q: Can I make these without a kitchen torch? A: Yes! You can use your oven’s broiler. Place the sugar-topped bars on a baking sheet and broil for 1-2 minutes, watching very carefully to avoid burning. Position the rack about 6 inches from the heat source for more control.
Q: Why did my cheesecake crack? A: Cheesecakes typically crack from overbaking or rapid temperature changes. Make sure to bake just until the center is slightly jiggly, then cool gradually in the turned-off oven with the door cracked.
Q: Can I use low-fat cream cheese? A: While you can, I don’t recommend it. Full-fat cream cheese provides the rich, creamy texture that makes these bars special. Low-fat versions often contain additives that can affect the texture and baking properties.
Q: How do I know when the cheesecake is done baking? A: The edges should be set, but the center should still have a slight jiggle when you gently shake the pan. It will continue to set as it cools.
Q: My sugar topping isn’t hardening properly. What went wrong? A: The most common cause is moisture on the surface of the cheesecake. Make sure the bars are thoroughly chilled and the surface is dry before sprinkling with sugar. Also, make sure you’re using granulated sugar, not powdered or brown sugar.
Q: Can I make these in a different size pan? A: Yes, but you’ll need to adjust the baking time. An 8×8 inch pan will make thicker bars that need about 10-15 minutes longer to bake. A larger pan will make thinner bars that may bake more quickly.
Q: Do I really need to let them chill for 4 hours? A: Yes! This chilling time is crucial for the cheesecake to set properly and develop its flavor. If possible, overnight chilling is even better.
Q: Can I freeze these bars? A: Absolutely! Freeze them without the sugar topping, well-wrapped, for up to a month. Thaw overnight in the refrigerator, then add the sugar and torch before serving.
Final Thoughts
Creating these Crème Brûlée Cheesecake Bars takes a bit of time and patience, but the result is truly worth it. The combination of smooth, creamy cheesecake with that characteristic crackly sugar topping creates a dessert experience that’s greater than the sum of its parts.
I hope you’ll try making these bars for your next special occasion – or perhaps just because it’s Tuesday and you deserve something extraordinary! The joy of watching someone crack through that caramelized layer to the creamy cheesecake beneath never gets old.
Remember, baking is both a science and an art. Don’t be discouraged if your first attempt isn’t perfect. Each time you make these bars, you’ll learn something new and refine your technique. That’s the beauty of being in the kitchen – there’s always more to discover, more to taste, and more to share.
Happy baking!