There’s something magical about the combination of graham crackers, chocolate, and toasted marshmallows that brings back childhood memories of camping trips and bonfires. I’ve always loved traditional s’mores, but as someone who’s equally passionate about cheesecake, I couldn’t help but wonder: what if I combined these two beloved desserts? The result is this incredibly decadent S’mores Cheesecake that has become my family’s most requested treat for special occasions.
In this article, I’ll guide you through creating a showstopping dessert that captures all the nostalgic flavors of s’mores while elevating them with the creamy sophistication of cheesecake. Whether you’re looking to impress guests at your next gathering or simply want to treat yourself to something extraordinary, this recipe delivers on all fronts.
What Makes This S’mores Cheesecake Special
Before diving into the recipe, let me share why this particular approach stands out:
- Authentic Graham Cracker Crust: Unlike some versions that use pre-made crusts, we’re making our own with real graham crackers for that genuine s’mores foundation.
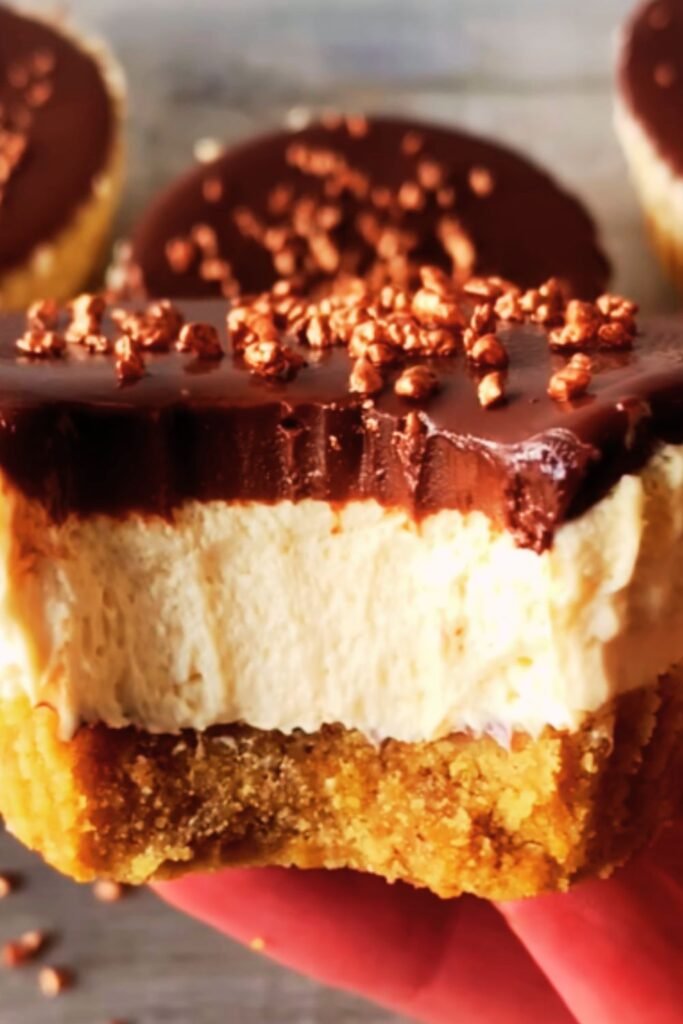
- Chocolate Ganache Layer: An indulgent layer of ganache sits between the crust and cheesecake filling, ensuring chocolate in every bite.
- Homemade Marshmallow Topping: We’re creating a fluffy marshmallow topping that gets toasted to perfection.
- Balance of Textures: From the crisp crust to the creamy filling and the gooey marshmallow topping, every texture you love about s’mores is represented.
Essential Ingredients
For the Graham Cracker Crust:
- 2 cups graham cracker crumbs (about 15-16 full sheets)
- 1/4 cup granulated sugar
- 1/2 cup (1 stick) unsalted butter, melted
- 1/4 teaspoon salt
For the Chocolate Ganache Layer:
- 1 cup semi-sweet chocolate chips
- 1/2 cup heavy cream
- 1 tablespoon unsalted butter
For the Cheesecake Filling:
- 24 ounces (3 packages) cream cheese, at room temperature
- 1 cup granulated sugar
- 3 large eggs, at room temperature
- 1/4 cup heavy cream
- 1/4 cup sour cream
- 2 teaspoons vanilla extract
- 1/4 teaspoon salt
- 1/2 cup mini chocolate chips
For the Marshmallow Topping:
- 2 1/2 teaspoons unflavored gelatin (1 packet)
- 1/3 cup cold water
- 1 cup granulated sugar
- 1/2 cup light corn syrup
- 1/4 cup water
- 1/4 teaspoon salt
- 1 teaspoon vanilla extract
- Additional graham cracker pieces and chocolate squares for garnish
Kitchen Equipment You’ll Need
- 9-inch springform pan
- Food processor (for crushing graham crackers)
- Heavy-bottomed saucepan
- Stand mixer or hand mixer
- Rubber spatula
- Measuring cups and spoons
- Kitchen torch (optional, but recommended)
- Aluminum foil (for water bath)
- Large roasting pan (for water bath)
- Cooling rack
Nutritional Information
While this is definitely a decadent treat, here’s what you can expect from each serving (1/12 of the cheesecake):
| Nutrient | Amount per Serving |
|---|---|
| Calories | 645 |
| Total Fat | 42g |
| Saturated Fat | 24g |
| Cholesterol | 155mg |
| Sodium | 380mg |
| Total Carbohydrates | 61g |
| Dietary Fiber | 1.5g |
| Sugars | 52g |
| Protein | 8g |
Step-by-Step Instructions
Preparing the Graham Cracker Crust
- Preheat your oven to 325°F (165°C).
- Wrap the outside of a 9-inch springform pan with aluminum foil, ensuring it comes at least halfway up the sides. This prevents water from seeping in during the water bath baking process.
- In a food processor, pulse graham crackers until they form fine crumbs. You can also place them in a ziplock bag and crush them with a rolling pin.
- In a medium bowl, combine the graham cracker crumbs, sugar, melted butter, and salt. Mix until the mixture resembles wet sand.
- Press the mixture firmly and evenly into the bottom and about 1 inch up the sides of the springform pan. I like to use the bottom of a measuring cup to press it down firmly.
- Bake the crust for 10 minutes, then remove from the oven and let cool while you prepare the ganache.
Creating the Chocolate Ganache Layer
- Place the chocolate chips in a heatproof bowl.
- In a small saucepan, heat the heavy cream until it just begins to simmer (don’t let it boil).
- Pour the hot cream over the chocolate chips and let it sit for 2-3 minutes.
- Add the tablespoon of butter, then whisk until smooth and glossy.
- Pour the ganache over the cooled crust, spreading it evenly.
- Refrigerate for at least 15 minutes until the ganache is set.
Making the Cheesecake Filling
- Reduce oven temperature to 300°F (150°C).
- In a large bowl, beat the cream cheese with an electric mixer on medium speed until completely smooth and lump-free, about 3 minutes.
- Add the sugar and beat for another 2 minutes until well incorporated.
- Add the eggs one at a time, beating just until each is incorporated. Be careful not to overmix after adding the eggs as this can cause the cheesecake to crack.
- Add the heavy cream, sour cream, vanilla extract, and salt. Mix on low speed until just combined.
- Gently fold in the mini chocolate chips with a rubber spatula.
- Pour the cheesecake mixture over the set ganache layer.
The Water Bath Method
- Place the foil-wrapped springform pan in a larger roasting pan.
- Pour hot water into the roasting pan until it reaches about halfway up the sides of the springform pan.
- Carefully place the entire setup in the oven.
- Bake for 60-70 minutes, or until the edges are set but the center still has a slight jiggle when gently shaken.
- Turn off the oven, crack the door open slightly, and let the cheesecake cool in the oven for 1 hour. This gradual cooling helps prevent cracks.
- Remove from the oven, then from the water bath, and let cool completely on a wire rack.
- Once cooled to room temperature, refrigerate for at least 6 hours or overnight.
Creating the Marshmallow Topping
- In the bowl of a stand mixer, sprinkle the gelatin over 1/3 cup cold water and let stand for about 5 minutes to bloom.
- In a medium saucepan, combine the sugar, corn syrup, 1/4 cup water, and salt. Stir over medium heat until the sugar dissolves.
- Increase the heat to high and boil without stirring until the mixture reaches 240°F (115°C) on a candy thermometer.
- With the mixer on low speed, slowly pour the hot syrup into the gelatin mixture.
- Gradually increase the speed to high and beat for 5-7 minutes until the mixture is very thick, white, and tripled in volume.
- Beat in the vanilla extract.
- Working quickly, spread the marshmallow topping over the chilled cheesecake.
The Final Touch: Toasting the Marshmallow
- Let the marshmallow topping set for about 30 minutes in the refrigerator.
- Use a kitchen torch to toast the marshmallow topping until golden brown and slightly charred in spots. If you don’t have a kitchen torch, you can place the cheesecake under the broiler for 30-60 seconds, watching very carefully to prevent burning.
- Garnish with additional graham cracker pieces and chocolate squares pressed gently into the topping.
Troubleshooting Common Issues
Even experienced bakers can face challenges when making cheesecake. Here are solutions to some common problems:
| Issue | Cause | Solution |
|---|---|---|
| Cracked Cheesecake | Overmixing or sudden temperature changes | Mix just until ingredients are incorporated, use a water bath, and cool gradually |
| Soggy Crust | Water leaking into the springform pan | Use multiple layers of heavy-duty foil wrapped tightly around the pan |
| Runny Marshmallow Topping | Syrup not heated to correct temperature | Use a candy thermometer to ensure proper temperature (240°F) |
| Uneven Toasting | Using broiler instead of torch | Rotate the cheesecake frequently under the broiler, or invest in a kitchen torch |
| Cheesecake Not Setting | Not chilled long enough | Allow at least 6 hours in the refrigerator, preferably overnight |
Serving Suggestions
This S’mores Cheesecake is a showstopper that deserves proper presentation:
- Serve chilled but let it sit at room temperature for about 15 minutes before slicing for the best texture and flavor.
- Use a thin, sharp knife dipped in hot water and wiped clean between cuts for beautiful slices.
- Pair with a strong cup of coffee to balance the sweetness.
- For extra indulgence, drizzle individual slices with additional chocolate sauce.
- For a refreshing contrast, serve with a small scoop of vanilla ice cream.
Make-Ahead and Storage Tips
- This cheesecake can be prepared up to 3 days in advance. Simply keep it refrigerated without the marshmallow topping.
- Add the marshmallow topping and toast it the day you plan to serve.
- Store leftovers in an airtight container in the refrigerator for up to 5 days.
- For longer storage, you can freeze individual slices wrapped tightly in plastic wrap and aluminum foil for up to 2 months. Thaw overnight in the refrigerator before serving.
Variations to Try
Want to put your own spin on this recipe? Here are some delicious variations:
- Peanut Butter S’mores Cheesecake: Add 1/2 cup of creamy peanut butter to the cheesecake filling for a delicious twist.
- Mint Chocolate S’mores Cheesecake: Add 1/2 teaspoon of peppermint extract to the filling and use mint chocolate chips.
- Caramel S’mores Cheesecake: Drizzle caramel sauce between the ganache and cheesecake layers.
- Dark Chocolate Version: Substitute the semi-sweet chocolate with dark chocolate (70% cacao) for a less sweet, more sophisticated flavor.
- Nutella S’mores Cheesecake: Replace half of the ganache with Nutella for a hazelnut chocolate flavor.
Frequently Asked Questions
Q: Can I make this recipe without a springform pan? A: While a springform pan is ideal for cheesecakes, you can use a deep 9-inch cake pan lined with parchment paper with extra hanging over the sides to help lift the cheesecake out when done. Just be aware that the sides won’t be as neat.
Q: Is the water bath really necessary? A: Yes, the water bath helps the cheesecake bake evenly and prevents cracks by creating a humid environment in the oven. It’s worth the extra step for a perfect result.
Q: My marshmallow topping is setting too quickly to spread. What can I do? A: The marshmallow mixture does set quickly, so work fast. If it starts to set before you’ve spread it, warm the spatula or knife under hot water, dry it, and continue spreading.
Q: Can I use marshmallow fluff instead of making my own marshmallow topping? A: Yes, you can use about 2 cups of store-bought marshmallow fluff if you’re short on time. However, homemade has a better texture and flavor.
Q: Do I need to use a kitchen torch? A: While a kitchen torch gives the best control for toasting the marshmallow topping, you can use your oven’s broiler. Place the cheesecake on the middle rack, 6-8 inches from the broiler, and watch it constantly, rotating as needed.
Q: My cheesecake is browning too much in the oven. What should I do? A: If you notice the top browning too much before the cheesecake is done, you can loosely tent it with aluminum foil.
Q: Can I make mini S’mores Cheesecakes instead? A: Absolutely! Use a muffin tin lined with paper liners. Reduce the baking time to about 20-25 minutes or until the centers are just set.
Final Thoughts
Creating this S’mores Cheesecake has become one of my favorite baking projects. While it does require several steps and some patience, the result is truly worth the effort. The combination of the crisp graham cracker crust, velvety chocolate ganache, creamy cheesecake filling, and toasted marshmallow topping creates a dessert experience that’s both nostalgic and sophisticated.
Remember that cheesecake-making is partly science and partly art—don’t be discouraged if your first attempt isn’t perfect. With practice, you’ll develop a feel for the right consistency and timing. And even if it doesn’t look picture-perfect, I guarantee it will still taste amazing!
I’d love to hear about your experiences making this recipe. Did you try any of the variations? How did the toasting technique work for you? Share your S’mores Cheesecake journey in the comments below!