When I first decided to recreate the iconic Oreo cookie in my kitchen, I never imagined it would become one of my most requested recipes. After countless experiments and taste tests, I’ve perfected a version that’s not only delicious but also accommodates multiple dietary restrictions without compromising on taste or texture.
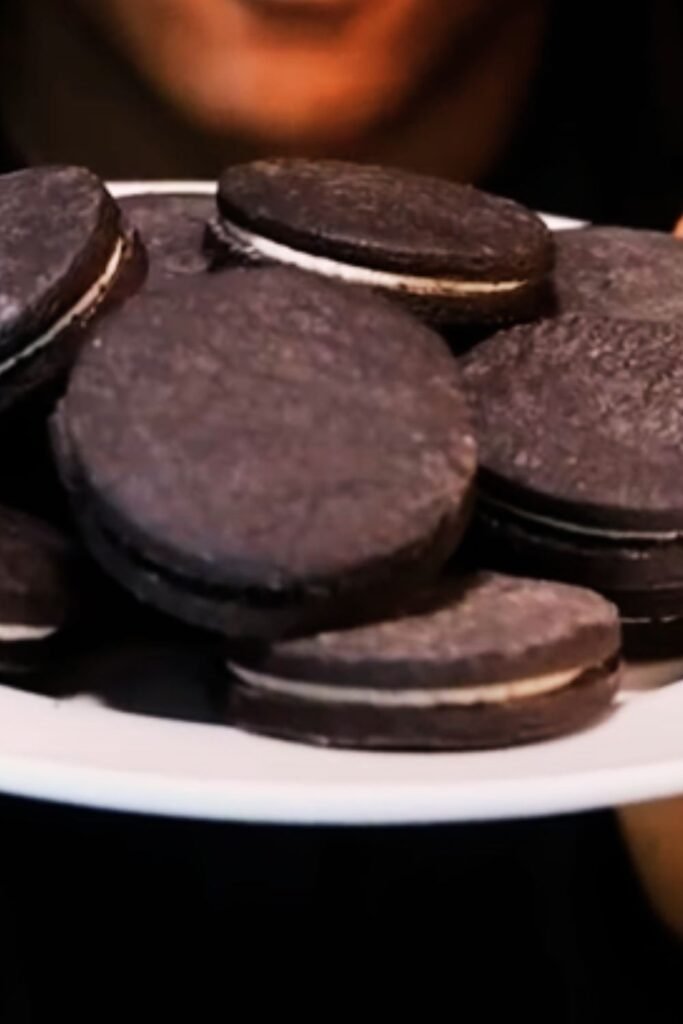
These homemade vegan Oreos are everything you love about the original – that perfect balance of crispy chocolate cookies with creamy vanilla filling – but they’re made with wholesome ingredients that everyone can enjoy. Whether you’re following a plant-based lifestyle, managing diabetes, dealing with gluten sensitivity, or simply wanting to avoid dairy, these cookies will satisfy your Oreo cravings completely.
The journey to creating these perfect copycat cookies taught me so much about alternative baking. I discovered that achieving that distinctive dark chocolate color and rich flavor without traditional ingredients requires understanding how different components interact. The key lies in using high-quality cocoa powder, the right combination of gluten-free flours, and natural sweeteners that won’t spike blood sugar levels.
Understanding the Challenge of Alternative Oreos
Creating vegan, gluten-free, and sugar-free Oreos presents unique challenges that I’ve learned to overcome through trial and error. Traditional Oreos rely heavily on refined sugar for sweetness, wheat flour for structure, and dairy products for richness in the cream filling. Removing these components while maintaining the beloved taste and texture requires careful ingredient selection and precise technique.
Key Challenges and Solutions:
- Structural integrity without gluten: Gluten provides elasticity and structure in traditional cookies. I solve this by combining different gluten-free flours and adding binding agents like xanthan gum.
- Sweetness without refined sugar: Natural sweeteners behave differently than regular sugar in baking. I use a combination of erythritol and stevia to achieve the right level of sweetness without the blood sugar spike.
- Richness without dairy: The cream filling traditionally contains butter and milk. I replace these with coconut oil and cashew cream for that luxurious mouthfeel.
- Deep chocolate flavor: Without the enhancing properties of refined sugar, achieving that intense chocolate taste requires high-quality Dutch-processed cocoa powder and a touch of espresso powder.
Essential Ingredients Breakdown
Understanding each ingredient’s role in these alternative Oreos helps ensure baking success every time. I’ve carefully selected each component to work harmoniously together while meeting all dietary restrictions.
Cookie Base Ingredients
Gluten-Free Flour Blend:
- Almond flour (40%): Provides richness, healthy fats, and a tender texture
- Oat flour (30%): Adds structure and a subtle nutty flavor
- Tapioca starch (20%): Creates chewiness and helps bind ingredients
- Coconut flour (10%): Absorbs moisture and adds fiber
Sweetening System:
- Erythritol: Provides bulk and sweetness with minimal glycemic impact
- Stevia extract: Intensifies sweetness without adding calories
- Monk fruit sweetener: Rounds out the sweetness profile naturally
Visit Amazon for any required items
Flavor and Texture Components:
- Dutch-processed cocoa powder: Creates that distinctive dark chocolate flavor
- Instant espresso powder: Enhances chocolate taste without coffee flavor
- Vanilla extract: Balances the chocolate and adds complexity
- Coconut oil: Provides fat for texture and helps bind ingredients
- Aquafaba: Acts as an egg replacer for binding and moisture
Cream Filling Ingredients
The cream filling is where I really had to get creative. Traditional Oreo cream is loaded with powdered sugar and dairy fat. My version uses naturally sweet alternatives that create the same luxurious texture.
Base Components:
- Raw cashews (soaked): Create creaminess when blended
- Coconut cream: Adds richness and helps achieve the right consistency
- Coconut oil (solid): Provides structure and prevents melting
- Powdered erythritol: Sweetens without grittiness when properly processed
Flavor Enhancement:
- Pure vanilla extract: Essential for that classic Oreo cream taste
- Lemon juice: A tiny amount brightens the flavor without being detectable
- Sea salt: Enhances sweetness and balances flavors
Detailed Recipe Instructions
Cookie Preparation
Step 1: Prepare Your Workspace I always start by organizing my ingredients and preheating my oven to 325°F (163°C). Line two large baking sheets with parchment paper or silicone mats. Having everything ready makes the process smoother and ensures even baking.
Step 2: Create the Dry Mixture In a large bowl, whisk together:
- 1¼ cups gluten-free flour blend
- ¾ cup Dutch-processed cocoa powder
- ½ cup erythritol, finely ground
- 1 teaspoon xanthan gum (if not in flour blend)
- ½ teaspoon baking powder
- ½ teaspoon sea salt
- 1 teaspoon instant espresso powder
I sift this mixture twice to ensure there are no lumps, which is crucial for smooth cookies.
Step 3: Prepare Wet Ingredients In a separate bowl, combine:
- ⅓ cup melted coconut oil (cooled slightly)
- 3 tablespoons aquafaba (liquid from canned chickpeas)
- 1 tablespoon pure vanilla extract
- 2 tablespoons plant-based milk (unsweetened almond or oat)
- ½ teaspoon stevia extract
Whisk these ingredients thoroughly until well combined and slightly frothy.
Step 4: Combine and Form Dough Gradually add the wet ingredients to the dry mixture, stirring constantly. The dough will seem dry at first, but continue mixing. If it’s too crumbly, add plant milk one teaspoon at a time. If too wet, add more flour blend gradually.
The finished dough should hold together when pressed but not be sticky. I often chill the dough for 15 minutes to make handling easier.
Step 5: Shape the Cookies I use a small cookie scoop or tablespoon to portion the dough into uniform pieces. Roll each portion between my palms to form smooth balls, then place them on prepared baking sheets with about 2 inches of space between each cookie.
Using the bottom of a glass or measuring cup, gently flatten each ball to about ¼ inch thickness. For that authentic Oreo look, I use a fork to create a crosshatch pattern or a small round cookie stamp.
Step 6: Baking Process Bake for 12-15 minutes, rotating the pans halfway through. The cookies are done when they feel firm to the touch and have a matte finish. They’ll continue to firm up as they cool.
Let cookies cool on the baking sheet for 5 minutes before transferring to a wire rack. This prevents breaking and ensures the perfect texture.
Visit Amazon for any required items
Cream Filling Preparation
While the cookies cool, I prepare the cream filling. This needs time to set up properly, so timing is important.
Step 1: Prepare Cashews If you haven’t soaked your cashews overnight, you can quick-soak them by covering with boiling water for 30 minutes. Drain and rinse thoroughly.
Step 2: Blend the Base In a high-powered blender or food processor, combine:
- 1 cup soaked raw cashews
- ¼ cup solid coconut cream (the thick part from a chilled can)
- 2 tablespoons melted coconut oil
- 1 teaspoon pure vanilla extract
- Pinch of sea salt
Blend until completely smooth, scraping down sides as needed. This may take 3-5 minutes in a regular food processor.
Step 3: Add Sweetness Gradually add:
- ⅔ cup powdered erythritol (homemade or store-bought)
- ¼ teaspoon stevia extract
- 1 teaspoon lemon juice
Continue blending until the mixture is perfectly smooth and white. Taste and adjust sweetness as needed.
Step 4: Achieve Perfect Consistency The filling should be thick enough to hold its shape but spreadable. If too thick, add coconut cream one tablespoon at a time. If too thin, add more powdered erythritol or chill for 15 minutes.
Assembly Process
Step 1: Prepare for Assembly Ensure all cookies are completely cool. Line them up in pairs, matching similar sizes for the best appearance.
Step 2: Apply Filling Using a piping bag, small spoon, or offset spatula, apply about 1 tablespoon of filling to the flat side of one cookie. I like to pipe it in a spiral pattern for even distribution.
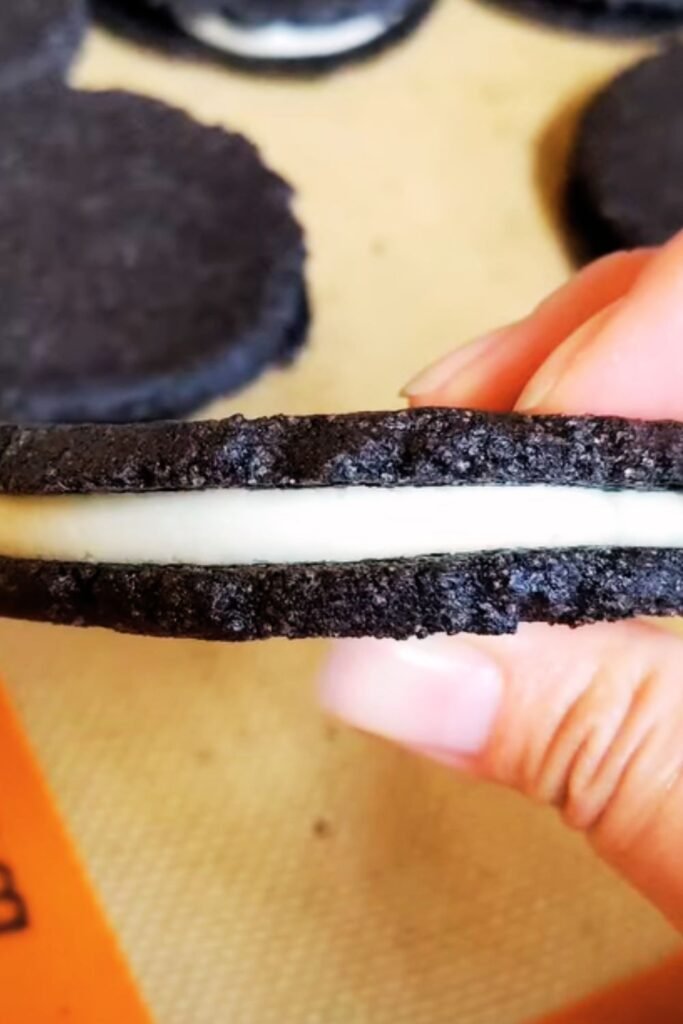
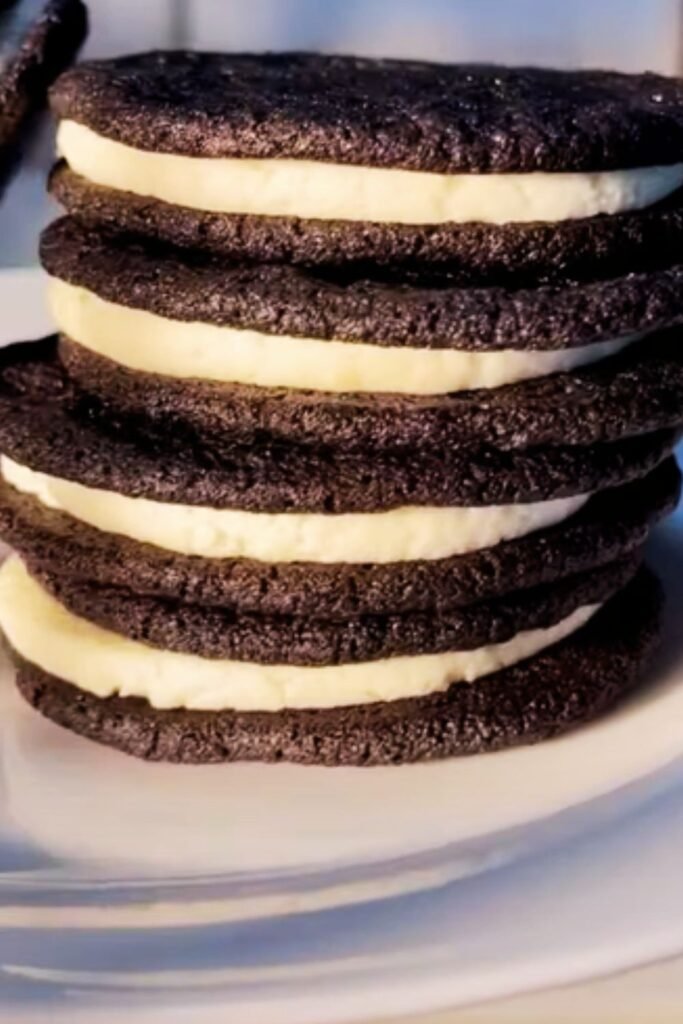
Step 3: Create the Sandwich Gently press the second cookie (flat side down) onto the filling. Give it a slight twist to distribute the filling evenly to the edges. The filling should just reach the cookie edges without overflowing.
Step 4: Setting Process Place assembled cookies on a tray and refrigerate for at least 30 minutes. This allows the filling to firm up and creates that perfect Oreo texture.
Nutritional Comparison Table
| Nutrient (per cookie) | Traditional Oreo | My Vegan Version | Health Benefits |
|---|---|---|---|
| Calories | 53 | 48 | Lower calorie density |
| Total Carbs | 8.3g | 6.2g | Reduced carb content |
| Sugar | 4.6g | 0.5g | 90% sugar reduction |
| Fiber | 0.4g | 2.1g | 5x more fiber |
| Protein | 0.6g | 1.8g | 3x more protein |
| Fat | 2.3g | 3.2g | Healthy plant fats |
| Sodium | 109mg | 45mg | 60% sodium reduction |
| Glycemic Impact | High | Minimal | Blood sugar friendly |
Storage and Shelf Life Guide
Proper storage is crucial for maintaining the texture and flavor of these homemade Oreos. I’ve learned through experience that different storage methods affect the cookies differently.
Room Temperature Storage: Store assembled cookies in an airtight container at room temperature for up to 5 days. Place parchment paper between layers to prevent sticking. The cookies will maintain their crispy texture but may soften slightly in humid conditions.
Refrigerated Storage: For longer storage, keep cookies refrigerated for up to 2 weeks. This keeps the cream filling firm and maintains the cookie structure. Allow cookies to come to room temperature for 10 minutes before serving for the best texture.
Freezer Storage: These cookies freeze beautifully for up to 3 months. Wrap individual cookies in plastic wrap or store in freezer-safe containers with parchment between layers. Thaw at room temperature for 15-20 minutes before enjoying.
Separate Component Storage: If making ahead, store cookies and filling separately. Unfilled cookies keep in airtight containers for up to 1 week at room temperature or 1 month frozen. Cream filling can be refrigerated for up to 1 week or frozen for 2 months.
Visit Amazon for any required items
Troubleshooting Common Issues
Through my baking journey, I’ve encountered and solved many common problems that arise when making these alternative Oreos.
Crumbly Cookie Dough: This usually indicates insufficient moisture. Add plant milk one teaspoon at a time until the dough holds together. Sometimes the absorbency of different flour brands varies, requiring adjustment.
Cookies Spreading Too Much: If cookies spread excessively during baking, the dough is too warm or wet. Chill the shaped cookies for 15 minutes before baking, and ensure your coconut oil was properly cooled before mixing.
Bland Flavor: Increase the cocoa powder by 2 tablespoons and add an extra ¼ teaspoon of espresso powder. Also, ensure your vanilla extract is pure and high-quality, as imitation vanilla creates an artificial taste.
Gritty Cream Filling: This happens when erythritol isn’t ground fine enough. Always powder erythritol in a food processor or coffee grinder before use. If grittiness persists, blend the filling longer or strain through a fine mesh.
Cookies Too Sweet or Not Sweet Enough: Stevia sensitivity varies among individuals. Start with less stevia and adjust to taste. Remember that sweetness intensifies after chilling, so taste-test the filling after it’s been refrigerated.
Flavor Variations and Customizations
Once you’ve mastered the basic recipe, these variations add exciting twists to your homemade Oreos.
Chocolate Mint Oreos: Add 1 teaspoon peppermint extract to the cream filling and a few drops of natural green food coloring. Include ¼ teaspoon mint extract in the cookie dough for an extra minty punch.
Birthday Cake Oreos: Replace vanilla extract in the filling with cake batter extract, and fold in 2 tablespoons of sugar-free sprinkles. Add a few drops of natural food coloring to create that festive look.
Peanut Butter Oreos: Replace half the cashews in the filling with natural peanut butter powder. Add 2 tablespoons of additional erythritol to balance the peanut flavor.
Double Chocolate Oreos: Add 2 tablespoons of mini sugar-free chocolate chips to the cookie dough and include 1 tablespoon of cocoa powder in the cream filling for chocolate lovers.
Strawberry Oreos: Use freeze-dried strawberries ground to powder (2 tablespoons) in the cream filling, along with natural pink coloring. The strawberry flavor is intense and naturally sweet.
Serving Suggestions and Pairings
These homemade vegan Oreos are delicious on their own, but I love serving them in creative ways that enhance the experience.
With Beverages:
- Plant-based milk (oat, almond, or cashew) for the classic cookie-dunking experience
- Herbal teas like chamomile or mint complement the chocolate beautifully
- Coffee or espresso creates a sophisticated adult treat
- Fresh fruit smoothies balance the richness with natural vitamins
Dessert Applications:
- Crumble over dairy-free ice cream for a cookies and cream experience
- Layer in trifles with coconut whipped cream and berries
- Use as a crust for vegan cheesecakes or chocolate tarts
- Incorporate into energy balls or protein bars for added texture
Special Occasion Ideas:
- Package in clear bags with ribbon for homemade gifts
- Serve alongside fresh fruit at dinner parties
- Create cookie sandwiches with different filling flavors for variety
- Use as decoration for vegan birthday cakes or cupcakes
Health Benefits and Nutritional Advantages
These alternative Oreos offer significant health advantages over traditional versions while maintaining incredible taste.
Blood Sugar Management: The combination of erythritol and stevia provides sweetness without causing blood sugar spikes. This makes these cookies suitable for people managing diabetes or following low-glycemic diets.
Digestive Health: The high fiber content from almond flour and coconut flour supports healthy digestion. The prebiotic fiber feeds beneficial gut bacteria, promoting overall digestive wellness.
Heart Health: Plant-based fats from nuts and coconut provide healthy monounsaturated and medium-chain fatty acids. These support cardiovascular health and provide sustained energy.
Protein Content: With three times the protein of regular Oreos, these cookies provide more satisfying nutrition. The plant-based proteins from nuts offer complete amino acid profiles.
Antioxidant Power: Dutch-processed cocoa is rich in flavonoids and antioxidants that support brain health and may reduce inflammation in the body.
Visit Amazon for any required items
Questions and Answers
Q: Can I make these cookies without a food processor? I’ve successfully made the cream filling using a high-powered blender, though it takes longer to achieve complete smoothness. For the cookies, a regular mixing bowl and whisk work perfectly. The key is ensuring the cashews are well-soaked if you’re not using a food processor.
Q: What’s the best way to make powdered erythritol at home? I grind regular erythritol in my coffee grinder for about 30 seconds until it reaches a powdery consistency. Some food processors work well too, but coffee grinders create the finest texture. Always let the dust settle before opening the grinder.
Q: Can I substitute the aquafaba with something else? Absolutely! Ground flaxseed mixed with water (1 tablespoon ground flax + 3 tablespoons water, let sit 5 minutes) works wonderfully. Commercial egg replacers following package directions for one egg also work well.
Q: Why do my cookies taste bitter? Bitterness usually comes from too much cocoa powder or using natural cocoa instead of Dutch-processed. Dutch-processed cocoa is alkalized, making it less acidic and bitter. Also, ensure your stevia isn’t old, as it can develop bitter notes over time.
Q: Can I make these cookies oil-free? Yes! I’ve successfully replaced coconut oil with unsweetened applesauce (use about half the amount) or mashed banana. The texture will be slightly more cake-like, but they’re still delicious. For the filling, try using extra cashew cream instead of coconut oil.
Q: How can I make the cookies more crispy? For extra crispiness, bake the cookies 2-3 minutes longer until they feel very firm. Also, ensure they cool completely on the baking sheet before moving them. Lower moisture content in the dough also helps – add flour if the dough seems too wet.
Q: Are these suitable for people with nut allergies? The cashew cream filling contains tree nuts, but I’ve made successful versions using sunflower seed butter as the base. Soak hulled sunflower seeds overnight and blend them just like cashews. The flavor is slightly different but equally delicious.
Q: Can I make these cookies smaller or larger? Definitely! Adjust the baking time accordingly – smaller cookies need about 8-10 minutes, while larger ones might need 15-18 minutes. Watch for the matte finish and firm texture to determine doneness regardless of size.
Q: What’s the secret to getting them to taste exactly like Oreos? The key is in the details: using Dutch-processed cocoa for that distinctive chocolate flavor, adding espresso powder to deepen the taste without making it coffee-flavored, and getting the sweetness balance just right in both the cookies and cream. Don’t skip the salt – it enhances all the flavors.
Q: Can I make just the cookies without the filling? Absolutely! These chocolate wafers are delicious on their own and make great dunking cookies. They’re perfect for people who prefer less sweet treats or want to use them as a base for other dessert applications.
These homemade vegan Oreos have become a staple in my kitchen, and I hope they bring as much joy to your home as they do to mine. The beauty of this recipe lies not just in accommodating dietary restrictions, but in creating something that’s genuinely better than the original – more nutritious, more flavorful, and made with love in your own kitchen.