I’ve been making this incredible No-Bake Chocolate Eclair Cake for over a decade, and I can honestly say it’s one of the most requested desserts at every family gathering I attend. There’s something magical about transforming simple graham crackers into what tastes like an elaborate French pastry, all without turning on your oven. This dessert has saved me countless times when I needed an impressive treat but was short on time or dealing with a broken oven.
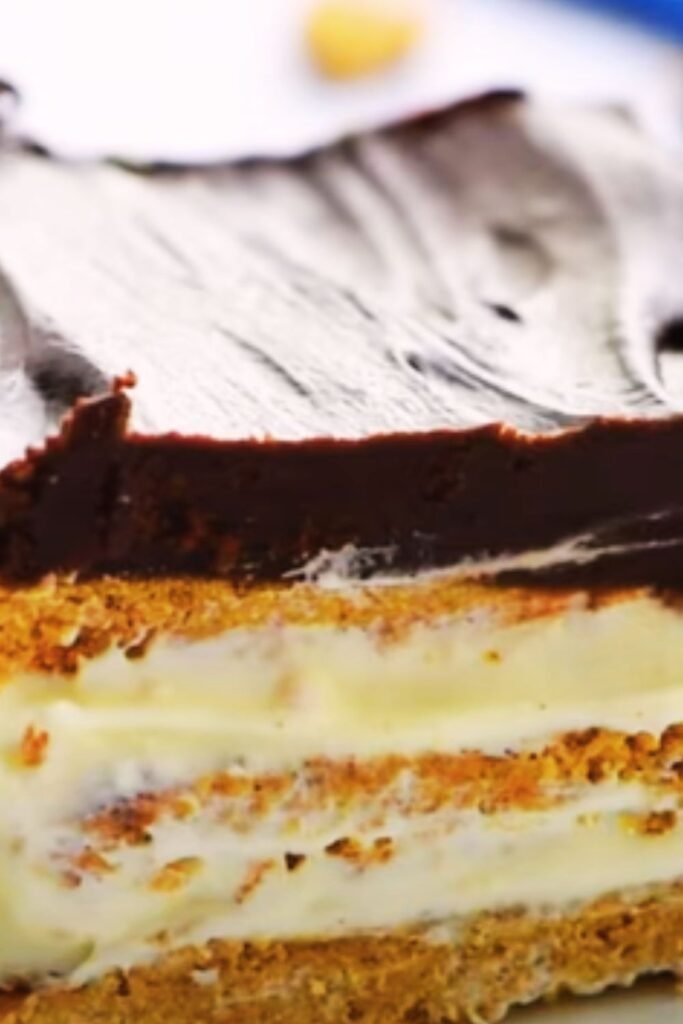
The beauty of this recipe lies in its simplicity and the way it develops its flavors overnight. What starts as layers of crackers and pudding transforms into something that genuinely resembles the texture and taste of traditional chocolate eclairs. The graham crackers soften to mimic pastry, while the pudding layers create that classic eclair filling experience.
What Makes This Dessert So Special
The No-Bake Chocolate Eclair Cake represents everything I love about home baking: it’s approachable, forgiving, and delivers restaurant-quality results. Unlike traditional eclairs that require pastry skills and precise timing, this version allows anyone to create an impressive dessert using pantry staples.
Key Benefits:
- No baking required
- Make-ahead friendly
- Feeds a crowd easily
- Uses simple, accessible ingredients
- Perfect for hot weather
- Great for beginners

Essential Ingredients Breakdown
Understanding each component helps you achieve the best results and make successful substitutions when needed.
Base Layer Components
Graham Crackers (Honey or Cinnamon) : These form the “pastry” layers of our eclair cake. I prefer honey graham crackers for their subtle sweetness, but cinnamon adds a lovely warm note. You’ll need about 2 sleeves (18 crackers) per layer, and we’ll create 3 layers total.
Instant Vanilla Pudding Mix : The heart of our filling. I always use instant rather than cook-and-serve because it sets up perfectly with cold milk and maintains the right consistency for layering. Two 3.4-ounce boxes work perfectly for this recipe.
Cold Whole Milk : The fat content matters here. Whole milk creates the richest, most stable pudding base. I’ve tried this with lower-fat options, but the texture suffers significantly.
Whipped Topping (Cool Whip) : This lightens the pudding and creates that cloud-like texture reminiscent of eclair cream. I use the 8-ounce container, though you can substitute freshly whipped heavy cream if you prefer.
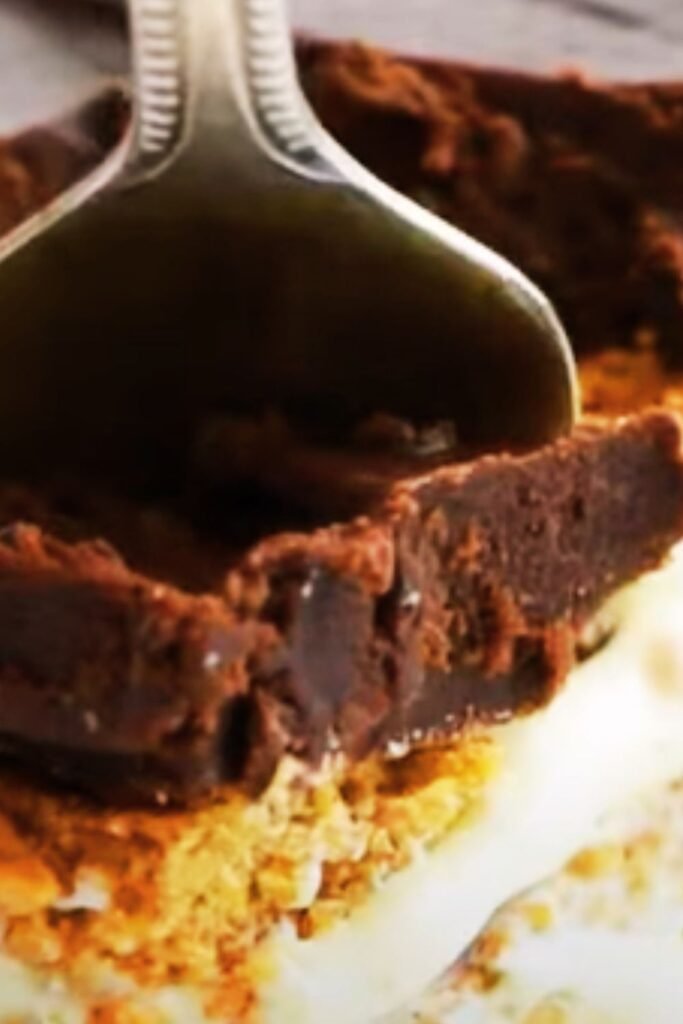
Chocolate Ganache Topping
Semi-Sweet Chocolate Chips : I prefer semi-sweet for the perfect balance of sweetness and chocolate intensity. About 1 cup provides enough for a generous topping layer.
Heavy Cream : This creates our silky ganache. You’ll need about ½ cup, and the higher fat content is crucial for proper consistency.
Vanilla Extract : Just a teaspoon enhances all the flavors and adds depth to the chocolate topping.
Detailed Preparation Method
Step 1: Prepare Your Pan and Workspace
I always start by lining a 9×13-inch dish with parchment paper, leaving overhang for easy removal. This isn’t absolutely necessary, but it makes serving so much cleaner and more professional-looking.
Step 2: Create the Pudding Base
In a large mixing bowl, whisk together the instant pudding mix with cold milk. I whisk vigorously for about 2 minutes until the mixture begins to thicken. The key here is using genuinely cold milk – I often chill my bowl and whisk beforehand too.
Once the pudding starts to set (about 3-4 minutes), gently fold in the whipped topping. I use a rubber spatula and fold just until combined – overmixing can deflate the airiness we want.
Step 3: Assembly Process
First Layer: Arrange graham crackers in a single layer across the bottom of your prepared dish. I break crackers as needed to fit snugly – gaps are fine, but try to minimize them.
Second Layer: Spread half of the pudding mixture evenly over the crackers. I use an offset spatula for smooth, even coverage.
Third Layer: Add another complete layer of graham crackers.
Fourth Layer: Spread the remaining pudding mixture evenly.
Final Layer: Top with the last layer of graham crackers.
Step 4: Prepare the Chocolate Ganache
In a microwave-safe bowl, combine chocolate chips and heavy cream. Microwave in 30-second intervals, stirring between each, until smooth. This usually takes 2-3 intervals total. Stir in vanilla extract.
Allow the ganache to cool for about 10 minutes before spreading – this prevents it from melting the pudding layers beneath.
Step 5: Final Assembly and Chilling
Spread the ganache evenly over the top layer of crackers. Cover tightly with plastic wrap and refrigerate overnight – this is crucial for proper texture development.
Nutritional Information and Serving Details
| Nutrient | Per Serving (12 servings) | Daily Value % |
|---|---|---|
| Calories | 285 | 14% |
| Total Fat | 12g | 15% |
| Saturated Fat | 8g | 40% |
| Cholesterol | 15mg | 5% |
| Sodium | 320mg | 14% |
| Total Carbohydrates | 45g | 16% |
| Dietary Fiber | 1g | 4% |
| Sugars | 32g | – |
| Protein | 4g | 8% |
| Calcium | 120mg | 12% |
| Iron | 1.2mg | 7% |
Preparation Timeline and Storage Guide
| Phase | Timeline | Storage Notes |
|---|---|---|
| Active Prep | 25 minutes | Work at room temperature |
| Ganache Cooling | 10 minutes | Don’t rush this step |
| Initial Chilling | 4 hours minimum | Partial softening occurs |
| Overnight Rest | 8-24 hours | Optimal texture development |
| Storage Period | Up to 4 days | Keep refrigerated, covered |
| Freezer Storage | Up to 2 months | Wrap well, thaw overnight |
Troubleshooting Common Issues
Pudding Too Thin : This usually means the milk wasn’t cold enough or you didn’t whisk long enough initially. Chill the mixture for 30 minutes and it should firm up.
Crackers Not Softening : Insufficient chilling time is the culprit. This dessert truly needs overnight refrigeration for proper texture.
Ganache Too Thick : Add cream one tablespoon at a time until spreadable. If it’s too thin, let it cool longer.
Uneven Layers : Take time with your spatula work. An offset spatula makes a huge difference in achieving smooth, even layers.
Creative Variations I Love
Flavor Combinations
Strawberry Eclair Cake : Replace vanilla pudding with strawberry and add sliced fresh strawberries between layers. Top with white chocolate ganache.
Banana Cream Version : Use banana cream pudding, add sliced bananas, and finish with caramel drizzle instead of chocolate.
Peanut Butter Twist : Mix peanut butter into the pudding base and use chocolate graham crackers. Top with peanut butter ganache.
Lemon Delight : Lemon pudding with lemon graham crackers and white chocolate topping creates a bright, summery variation.
Presentation Upgrades
I sometimes add chopped nuts, mini chocolate chips, or fresh berries to the ganache before it sets. For special occasions, I’ll pipe decorative borders using leftover pudding mixture or create chocolate curls for the top.
Make-Ahead Strategies
This dessert is actually better when made ahead, making it perfect for entertaining. I often prepare it two days before serving, which allows the flavors to meld completely. For large gatherings, I’ll make two pans and vary the flavors.
The beauty of this recipe is its flexibility with timing. While overnight is the minimum, I’ve had excellent results after two or even three days of chilling.
Serving Suggestions and Occasions
Perfect Occasions
Summer BBQs and Pool Parties : No oven required makes this ideal for hot weather entertaining.
Potluck Dinners : Easily transportable and serves a crowd without breaking the budget.
Birthday Celebrations : Kids and adults both love the familiar flavors and impressive presentation.
Holiday Gatherings : Make ahead capability reduces day-of stress during busy holidays.
Serving Accompaniments
I love serving this with fresh berries or a small dollop of whipped cream. For coffee lovers, a strong espresso or cold brew complements the chocolate beautifully. Fresh mint leaves add a lovely aromatic touch and visual appeal.
Professional Tips for Best Results
Through years of making this dessert, I’ve learned several tricks that elevate the final result:
Temperature Control: Keep all ingredients cold until assembly. Warm pudding won’t set properly and can make crackers soggy prematurely.
Quality Matters: Use real vanilla extract rather than imitation, and choose good-quality chocolate chips for the ganache.
Patience Pays: Don’t rush the chilling process. The texture transformation is gradual but dramatic.
Clean Cuts: Use a sharp knife wiped clean between cuts for the most attractive serving pieces.
Ingredient Substitution Guide
| Original Ingredient | Substitution Options | Notes |
|---|---|---|
| Graham Crackers | Vanilla wafers, chocolate wafers | Changes texture slightly |
| Instant Pudding | Homemade pudding (cooled) | Must be completely cool |
| Cool Whip | Fresh whipped cream | Fold in gently to maintain volume |
| Semi-sweet chocolate | Dark chocolate, milk chocolate | Adjust cream ratio accordingly |
| Whole milk | 2% milk + 2 tbsp cream | Maintains richness |
| Heavy cream | Half-and-half + butter | For ganache only |
Cost-Effective Shopping Tips
I’ve found this dessert incredibly budget-friendly, especially when feeding a crowd. Generic brands work perfectly well for most ingredients. I often stock up on pudding mix and chocolate chips when they’re on sale since they keep well.
The most expensive component is usually the whipped topping, but buying the larger container and using what’s left for other desserts or coffee drinks makes it worthwhile.
Dietary Modifications
While this isn’t a health food, I’ve successfully made versions to accommodate different dietary needs:
Reduced Sugar: Sugar-free pudding mix and sugar-free chocolate chips work well, though the texture is slightly different.
Gluten-Free: Gluten-free graham crackers substitute perfectly without changing the method.
Dairy-Free: Non-dairy whipped topping and pudding made with plant milk create a surprisingly good result.
Why This Recipe Never Fails
The forgiving nature of this dessert makes it nearly impossible to ruin. Unlike traditional baking where measurements and techniques must be precise, this recipe adapts well to variations in technique and timing. Even if your layers aren’t perfectly even or your ganache isn’t mirror-smooth, the end result still tastes incredible.
The overnight chilling process masks many minor imperfections as everything melds together into cohesive, delicious layers that genuinely taste like elaborate pastry.
Frequently Asked Questions
Q: How long does this cake need to chill before serving? I recommend at least 8 hours, but overnight (12-24 hours) gives the best texture. The graham crackers need time to soften and absorb moisture from the pudding layers.
Q: Can I use homemade whipped cream instead of Cool Whip? Absolutely! Freshly whipped cream works beautifully. Just be sure it’s whipped to soft peaks and fold it very gently into the pudding to maintain the light texture.
Q: What’s the best way to cut clean slices? Use a sharp knife and wipe it clean with a damp cloth between each cut. I also like to score the top lightly before making full cuts to ensure even portions.
Q: Can this dessert be frozen? Yes, it freezes well for up to 2 months. Wrap tightly and thaw overnight in the refrigerator before serving. The texture remains remarkably good after freezing.
Q: Why are my graham crackers not softening properly? This usually indicates insufficient chilling time or that the pudding mixture wasn’t moist enough. Make sure you’re using the full amount of milk and giving it adequate refrigeration time.
Q: Can I make individual portions instead of one large pan? Definitely! Use mason jars or individual serving dishes to create elegant personal desserts. Layer the same way but adjust quantities accordingly.
Q: What should I do if my ganache is too thick to spread? Let it cool for a few more minutes if it’s too thin, or add a tablespoon of warm cream if it’s too thick. The ideal consistency coats the back of a spoon but still spreads easily.
Q: How far in advance can I make this dessert? I’ve made it successfully up to 3 days ahead. After that, the texture begins to break down slightly, though it’s still delicious.
Q: Can I add fresh fruit to the layers? Yes, but be cautious with high-water fruits like fresh strawberries, which can make the dessert soggy. Bananas work particularly well and complement the flavors beautifully.
Q: What’s the secret to getting restaurant-quality results at home? Take your time with each layer, use quality ingredients, and don’t skimp on the chilling time. Also, using an offset spatula for smooth layers makes a huge visual difference.