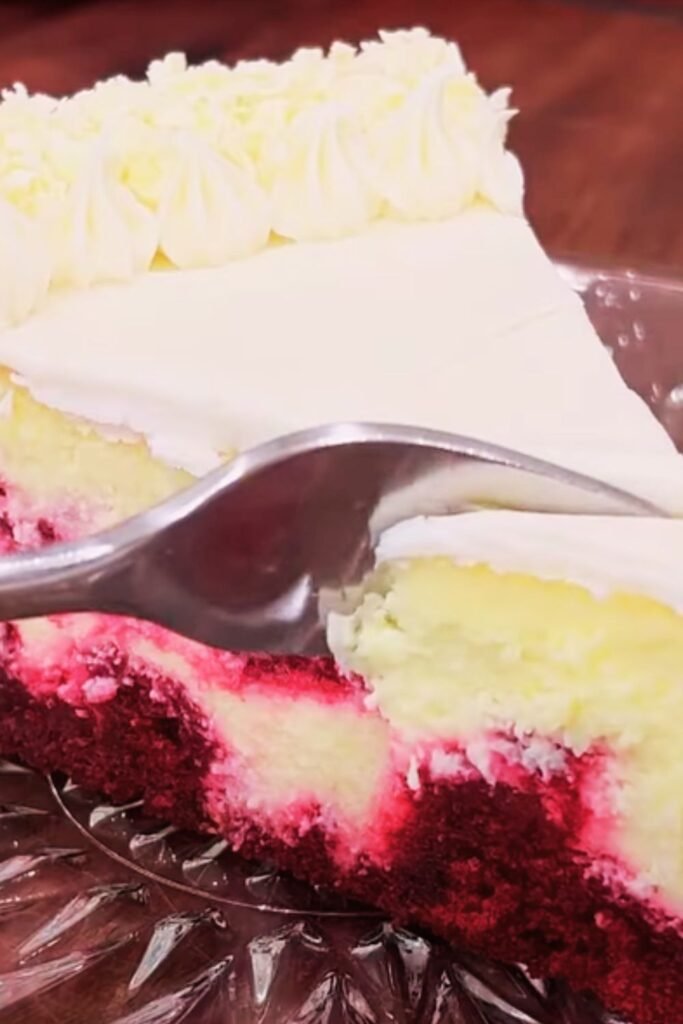
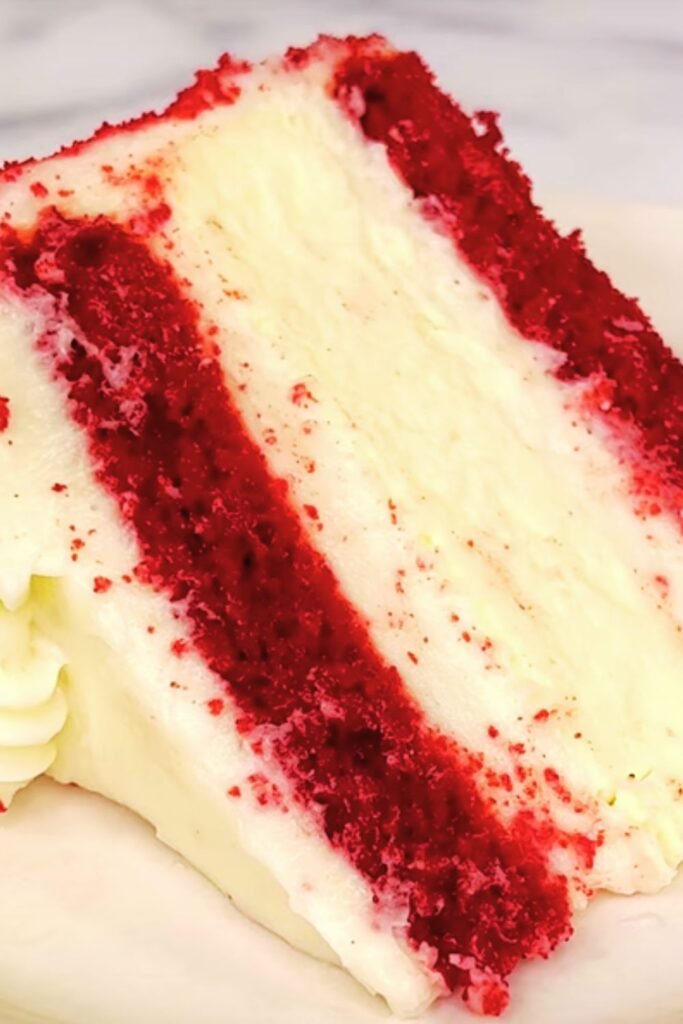
When I first combined the velvety richness of red velvet cake with the creamy indulgence of strawberry cheesecake, I knew I had stumbled upon something extraordinary. This show-stopping dessert brings together two beloved classics in a way that’s both visually stunning and absolutely delicious. The deep crimson layers paired with fresh strawberry flavors create a dessert that’s perfect for special occasions, romantic dinners, or whenever you want to impress your guests.
What makes this dessert truly special isn’t just its Instagram-worthy appearance – though the contrast between the rich red cake and pale pink cheesecake is absolutely gorgeous. It’s the way the tangy cream cheese perfectly balances the subtle chocolate notes in the red velvet, while fresh strawberries add bursts of natural sweetness throughout. I’ve spent years perfecting this recipe, and I’m excited to share every detail with you.
Understanding the Components
Before diving into the recipe, let me break down what makes this dessert work so beautifully:
Red Velvet Cake Base : A moist, tender cake with subtle chocolate flavor and that signature crimson color, traditionally achieved with cocoa powder and red food coloring
Strawberry Cheesecake Layer : A rich, creamy filling made with cream cheese, fresh strawberries, and just the right amount of sweetness
Fresh Strawberry Garnish : Sliced fresh berries that add color, texture, and natural fruit flavor
Cream Cheese Frosting : A classic tangy-sweet frosting that ties all the flavors together
The beauty of this combination lies in how each component complements the others. The slightly acidic tang from both the red velvet’s buttermilk and the cream cheese creates a perfect backdrop for the sweet strawberries.
Essential Ingredients and Their Roles
Creating the perfect red velvet strawberry cheesecake requires understanding why each ingredient matters. Here’s my detailed breakdown:
| Ingredient | Quantity | Purpose | Substitution Notes |
|---|---|---|---|
| All-purpose flour | 2½ cups | Structure and tenderness | Can use cake flour for lighter texture |
| Unsweetened cocoa powder | 2 tablespoons | Subtle chocolate flavor | Dutch-processed preferred |
| Baking soda | 1 teaspoon | Leavening agent | Essential for proper rise |
| Salt | 1 teaspoon | Flavor enhancement | Kosher or sea salt works |
| Vegetable oil | 1½ cups | Moisture and tenderness | Canola oil acceptable |
| Granulated sugar | 1½ cups | Sweetness and structure | Caster sugar for finer texture |
| Large eggs | 2 | Binding and richness | Room temperature preferred |
| Buttermilk | 1 cup | Tanginess and tenderness | Can make with milk + vinegar |
| Red food coloring | 2 tablespoons | Signature color | Gel coloring more vibrant |
| White vinegar | 1 teaspoon | Activates baking soda | Apple cider vinegar works |
| Vanilla extract | 1 teaspoon | Flavor enhancement | Pure extract preferred |
For the cheesecake layer, precision becomes even more critical:
| Cheesecake Ingredient | Quantity | Purpose | Quality Tips |
|---|---|---|---|
| Cream cheese | 24 oz (3 packages) | Base and richness | Room temperature essential |
| Granulated sugar | ¾ cup | Sweetness | Superfine dissolves better |
| Large eggs | 3 | Binding and structure | Add one at a time |
| Sour cream | ½ cup | Tanginess and smoothness | Full-fat preferred |
| Fresh strawberries | 2 cups | Flavor and color | Hull and dice small |
| Strawberry extract | 1 teaspoon | Concentrated flavor | Optional but recommended |
| Cornstarch | 2 tablespoons | Prevents cracking | Mix with sugar first |
Step-by-Step Red Velvet Base Preparation
Creating the perfect red velvet base requires attention to technique and timing. I’ve learned that the order of operations can make or break this cake.
Preparing Your Kitchen Start by preheating your oven to 350°F (175°C). I always line my 9-inch springform pan with parchment paper and lightly grease the sides. This extra step prevents sticking and makes removal much easier.
Mixing the Dry Ingredients In a large bowl, I whisk together the flour, cocoa powder, baking soda, and salt. This ensures even distribution and prevents lumps later. The cocoa powder amount might seem small, but it’s perfect – we want subtle chocolate notes, not an overwhelming chocolate flavor.
Creating the Wet Mixture In another bowl, I combine the oil and sugar, whisking until well blended. The oil creates a more tender crumb than butter, which is crucial for this recipe. Next, I add eggs one at a time, beating well after each addition. This gradual incorporation prevents the mixture from breaking.
The Buttermilk Addition Here’s where technique really matters. I alternate adding the dry ingredients and buttermilk to the oil mixture, beginning and ending with the dry ingredients. Mix just until combined – overmixing develops gluten and creates a tough cake.
The Color Magic Now comes the fun part – adding that signature red color. I mix the food coloring with the vanilla and vinegar before stirring it into the batter. This method ensures even color distribution without streaking.
Baking Perfection Pour the batter into your prepared pan and bake for 25-30 minutes, until a toothpick inserted in the center comes out with just a few moist crumbs. Don’t overbake – the cake will continue cooking slightly as it cools.
Mastering the Strawberry Cheesecake Layer
The cheesecake component requires a completely different approach from traditional baking. Temperature control and gentle handling are your best friends here.
Preparing the Strawberries I start by hulling and dicing my strawberries into small, uniform pieces. Pat them dry with paper towels and toss with a tablespoon of sugar. Let them sit for 15 minutes to release their juices, then drain. This prevents excess moisture from making the cheesecake watery.
The Cream Cheese Foundation Room temperature cream cheese is absolutely crucial – I can’t stress this enough. Cold cream cheese creates lumps that are nearly impossible to eliminate. Beat the cream cheese until completely smooth and fluffy, about 3-4 minutes with an electric mixer.
Sugar Integration Gradually add the sugar, beating until the mixture is light and smooth. I prefer to mix the cornstarch with the sugar before adding it – this helps prevent cracking and creates a silky texture.
Egg Addition Technique Add eggs one at a time, beating just until incorporated after each addition. Overbeating at this stage incorporates too much air, which can cause cracking and an uneven texture.
Final Flavor Additions Gently fold in the sour cream, strawberry extract, and prepared strawberries. The key word here is “gently” – we want to maintain the smooth texture we’ve worked so hard to achieve.
Assembly and Baking Techniques
The assembly process is where your red velvet strawberry cheesecake really comes together. I’ve learned that patience during this stage pays off enormously in the final result.
Layer Preparation Once your red velvet base has cooled completely, I carefully slice it horizontally into two even layers using a long serrated knife. A cake leveler works even better if you have one. The bottom layer goes back into your springform pan.
Cheesecake Distribution Pour the strawberry cheesecake mixture over the bottom cake layer, spreading it evenly with an offset spatula. Gently tap the pan on the counter to release air bubbles – this prevents holes in your finished cheesecake.
The Water Bath Method For the smoothest, most evenly baked cheesecake, I always use a water bath. Wrap the bottom of your springform pan tightly with heavy-duty aluminum foil to prevent water from seeping in. Place the pan in a larger roasting pan and add hot water until it reaches halfway up the sides.
Baking Temperature Control Reduce your oven temperature to 325°F (160°C) for the cheesecake portion. This lower temperature prevents cracking and ensures even cooking. Bake for 45-55 minutes, until the center is almost set but still slightly jiggly.
The Cooling Process Turn off the oven and crack the door open. Let the cheesecake cool in the oven for one hour – this gradual temperature change prevents cracking. Then remove from the water bath and cool completely at room temperature before refrigerating.
Advanced Decoration Techniques
The visual presentation of your red velvet strawberry cheesecake can transform it from delicious to absolutely spectacular. I’ve developed several techniques that consistently create stunning results.
Creating the Perfect Cream Cheese Frosting Beat 8 oz of room temperature cream cheese with 4 tablespoons of butter until fluffy. Gradually add 2 cups of powdered sugar, 1 teaspoon of vanilla, and a pinch of salt. The consistency should be smooth and pipeable.
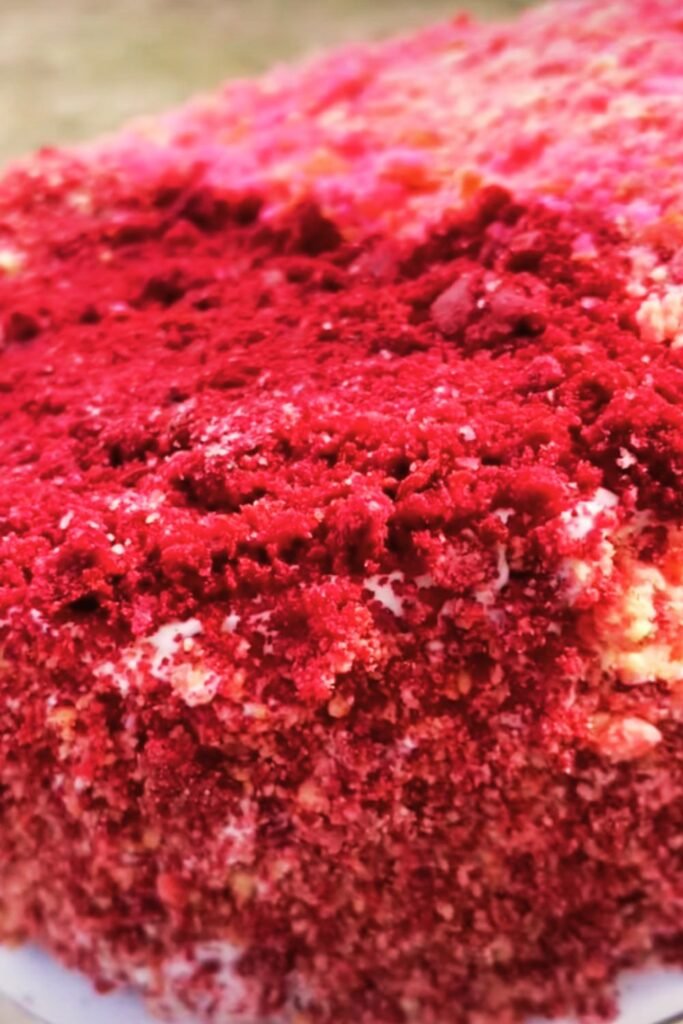
Strawberry Arrangement Patterns I like to create concentric circles of sliced strawberries on top, starting from the outside and working inward. For the most elegant look, slice strawberries uniformly and overlap them slightly. Fan patterns also work beautifully.
Frosting Application Methods Using a piping bag with a star tip, I create rosettes around the border of the cheesecake. This not only looks professional but also helps frame the strawberry arrangement. Alternatively, a simple offset spatula can create beautiful swoops and curves.
Color Enhancement Tips A light dusting of powdered sugar adds elegance, while a drizzle of strawberry sauce creates dramatic color contrast. I make a quick sauce by cooking down strawberries with a little sugar and lemon juice until thick.
Nutritional Information and Dietary Considerations
Understanding the nutritional profile of your red velvet strawberry cheesecake helps with portion planning and dietary accommodations.
| Nutritional Component | Per Slice (1/12 of cake) | Daily Value % |
|---|---|---|
| Calories | 485 | 24% |
| Total Fat | 28g | 36% |
| Saturated Fat | 16g | 80% |
| Cholesterol | 125mg | 42% |
| Sodium | 420mg | 18% |
| Total Carbohydrates | 54g | 20% |
| Dietary Fiber | 2g | 7% |
| Sugars | 45g | – |
| Protein | 8g | 16% |
| Vitamin C | 15mg | 17% |
| Calcium | 150mg | 12% |
Dietary Modification Options
For those with dietary restrictions, I’ve successfully adapted this recipe several ways:
Gluten-Free Version: Replace all-purpose flour with a 1:1 gluten-free baking blend. Add 1 teaspoon of xanthan gum if your blend doesn’t include it.
Reduced Sugar Option: You can reduce the sugar in both layers by up to 25% without significantly affecting texture. Consider using erythritol or stevia blends designed for baking.
Dairy-Free Adaptation: Use dairy-free cream cheese alternatives and substitute buttermilk with plant-based milk mixed with lemon juice.
Storage and Serving Guidelines
Proper storage techniques ensure your red velvet strawberry cheesecake maintains its quality and safety for maximum enjoyment.
| Storage Method | Duration | Quality Notes |
|---|---|---|
| Refrigerated (covered) | 5-7 days | Best texture and flavor |
| Frozen (whole) | 2-3 months | Wrap tightly in plastic |
| Frozen (slices) | 1 month | Individual wrap recommended |
| Room temperature | 2 hours maximum | Food safety limit |
Serving Temperature Tips I always remove the cheesecake from the refrigerator 15-20 minutes before serving. This slight warming enhances the flavors and creates a creamier texture. Use a sharp knife dipped in warm water and wiped clean between cuts for the cleanest slices.
Portion Control Strategies Given the richness of this dessert, I recommend smaller portions than typical cake servings. A 12-slice division works perfectly for most occasions, providing satisfying portions without overwhelming guests.
Troubleshooting Common Issues
Even experienced bakers encounter challenges with this complex dessert. Here are solutions to the most common problems I’ve encountered:
Cracked Cheesecake Surface This usually results from temperature shock or overbaking. Prevention includes using a water bath, gradual cooling, and not opening the oven door during baking. If cracks do appear, cover them with your strawberry topping – they’ll be completely hidden.
Soggy Bottom Crust Excess moisture from strawberries causes this issue. Always drain your strawberries well and consider adding an extra tablespoon of cornstarch to absorb moisture. Pre-baking the red velvet base for an extra 5 minutes can also help.
Uneven Red Velvet Color Insufficient mixing of food coloring creates streaks. Mix the coloring with vanilla and vinegar before adding to ensure even distribution. Gel food coloring provides more consistent results than liquid versions.
Dense Cheesecake Texture Overmixing or cold ingredients typically cause this. Always use room temperature ingredients and mix just until smooth. Overbeaten eggs create a dense, heavy texture.
Seasonal Variations and Flavor Adaptations
The beauty of this red velvet strawberry cheesecake lies in its adaptability to different seasons and flavor preferences.
Spring Variations Add lemon zest to the cheesecake layer for a bright, spring flavor. Fresh mint leaves make beautiful garnishes alongside strawberries.
Summer Adaptations Mix in other berries like raspberries or blueberries for a mixed berry version. A berry compote topping adds extra fruit flavor.
Fall Modifications Incorporate apple pieces and cinnamon into the cheesecake layer. Caramel drizzle complements the apple flavors beautifully.
Winter Versions Add chocolate chips to the cheesecake layer and garnish with chocolate shavings. Pomegranate seeds provide festive color and tartness.
Professional Presentation Tips
Creating a restaurant-quality presentation elevates your red velvet strawberry cheesecake from homemade to extraordinary.
Plating Techniques I use chilled plates and add artistic sauce drizzles around each slice. A small dollop of whipped cream and a fresh strawberry fan complete the professional look.
Photography Considerations Natural lighting showcases the colors best. The contrast between the red cake and pink filling photographs beautifully against white or neutral backgrounds.
Service Timing Plan your serving schedule carefully – this dessert looks and tastes best when properly chilled but not ice-cold. Remove from refrigerator 15 minutes before cutting.
Questions and Answers
Q: Can I make this cheesecake ahead of time for a party? Actually, this cheesecake improves with time! I recommend making it 1-2 days before serving. The flavors meld beautifully, and the texture becomes even more luxurious. Just add fresh strawberry garnishes on the day of serving to maintain their appearance.
Q: Why does my red velvet layer sometimes turn out brown instead of red? This usually happens when the cocoa powder reacts with too much acid or when the food coloring isn’t sufficient. Make sure you’re using the full amount of food coloring specified, and consider switching to gel coloring for more vibrant results. Also, some cocoa powders are more reactive than others.
Q: How do I prevent my cheesecake from cracking? The water bath method I described is crucial for preventing cracks. Additionally, avoid opening the oven door during baking, don’t overbeat the batter, and allow for gradual cooling. If small cracks do appear, don’t worry – your strawberry topping will cover them perfectly.
Q: Can I use frozen strawberries instead of fresh ones? You can, but fresh strawberries provide better texture and appearance. If using frozen, thaw them completely and drain thoroughly to remove excess moisture. Pat them dry with paper towels before incorporating into the cheesecake mixture.
Q: What’s the best way to cut clean slices? Use a sharp, thin-bladed knife dipped in warm water. Wipe the blade clean between each cut. This technique prevents the creamy filling from sticking to the knife and dragging across your beautiful presentation.
Q: How do I know when the cheesecake layer is properly baked? The center should be almost set but still have a slight jiggle when you gently shake the pan. It will continue to set as it cools. Overbaked cheesecake becomes dense and can crack, so err on the side of slightly underdone.
Q: Can I make individual portions instead of one large cake? Absolutely! Use 4-inch springform pans or even mason jars for individual servings. Reduce the baking time to about 25-30 minutes and adjust the red velvet base recipe accordingly. Individual portions make elegant presentations for dinner parties.
Q: What should I do if my cream cheese has lumps? Prevention is key – always use room temperature cream cheese. If you already have lumps, press the mixture through a fine-mesh sieve or use an immersion blender briefly to smooth it out. Avoid overmixing, which can affect the final texture.
Q: How long should I let the cake cool before removing it from the springform pan? I recommend cooling completely at room temperature, then refrigerating for at least 4 hours or overnight before removing the pan sides. This ensures the cheesecake is fully set and won’t crack or collapse when unmolded.
Q: Can I add other flavors to complement the strawberry? Vanilla pairs beautifully with strawberry, and I sometimes add a teaspoon of vanilla bean paste for extra depth. Lemon zest brightens the flavor profile, while a hint of almond extract adds sophistication. Avoid overpowering the delicate strawberry flavor with too many additions.
This red velvet strawberry cheesecake represents the perfect marriage of two beloved desserts. The rich, tender red velvet provides an ideal foundation for the creamy, fruit-forward cheesecake layer, while fresh strawberries add natural sweetness and beautiful color contrast. With proper technique and attention to detail, you’ll create a showstopping dessert that’s sure to become a favorite for special occasions and celebrations.
Remember that baking is both an art and a science – don’t be discouraged if your first attempt isn’t perfect. Each time you make this recipe, you’ll develop a better understanding of how the components work together. The key is patience, quality ingredients, and following the techniques I’ve shared from my years of perfecting this incredible dessert.